Friday, September 28, 2012

Blue Hawaiian


TGIF! Let's kick the weekend off right with an adult drink :). This recipe actually came out of an accident I made at the liquor store when I accidentally bought Blue Curacao cordial syrup. It's pretty awesome and I'm glad I made the mistake :)
 
Ingredients:
1 oz. Blue Curacao (I used Blue Curacao cordial syrup)
2 oz. Pina Colada Mix
2 oz. Rum (I only had Malibu Coconut Rum & it worked just as well)
2 oz. Half & Half Cream
 
Pour all your ingredients into a shaker and shake over ice. Next pour into a glass and enjoy! This drink goes down as easy as it is to make, these things are dangerous!
 
Tip: For a frozen Blue Hawaiian, place all the ingredients into a blender with about 6 ice cubes and blend until smooth.
 
 
Happy Drink Making
& Enjoy!!
Thursday, September 27, 2012

Lemon Crinkle Cookies

I hope everyone is enjoying their Thursday! Today's recipe is for some lemon cookies. I LOVE lemon, so I was very excited to try these. They are great!

Ingredients:
1 stick butter, softened
1 cup sugar
1/2 tsp. Vanilla
1 egg
1 tsp. lemon zest
Juice from 1 lemon
1 1/2 cup flour
1/4 tsp. salt
1/4 tsp. baking powder
1/8 tsp. baking soda
1/2 cup powdered sugar

Tip: Lemon zest is basically just part of the outside of the lemon. Before juicing your lemon, just take a cheese grater and grate some of the yellow part off the outside of the lemon. It's pretty easy so don't be scared!

To start off, pre-heat your oven to 350. Mix your butter and sugar together with an electric mixer until light & creamy. Next, add in your vanilla, egg, lemon zest, and lemon juice and mix together until incorporated. Next slowly add in your flour, salt, baking powder, and baking soda and mix until just incorporated. Make sure not to over-mix this part.

Put your powdered sugar on a plate (measurement of powdered sugar doesn't have to be exact, just enough for all your cookies). Next, scoop out your cookie mixture (about a Tbsp.), roll into a ball, and then roll around in the powdered sugar until covered. Place your ball on a cookie sheet and then repeat with the remaining cookie mixture. Here is a picture of what this looks like:
 
In this picture you can't see very much powdered sugar but trust me, they are covered! Your dough will be sticky before you put it in the powdered sugar but after it will be smooth.

Bake your cookies for 9-11 minutes. You should go for a matte look with your cookies, not brown. They should look like this when done:


Next step: eat! Seriously, these little cookies are dangerous for my friends that love a little lemon. :)

Happy Cooking
& Enjoy!
 
This recipe was adapted from here.
Wednesday, September 26, 2012

Southern-Style Sweet Tea


I'm a southern girl, and more importantly, a Texas girl. One thing we Texans are known for is our sweet tea. I know, I know, how hard could it be to make some sweet tea? Wellllllllllllll, northerners have been struggling with this for ages. There is a reason why there isn't any good tea north of the Red River ;). The ratio of tea to sugar is important to get your tea perfect, and I'm here to give you the secrets!

Ingredients:
2 Iced Tea bags
Approximately 1 Gallon of water
1 3/4 cup sugar

Tip: Any type of tea will work, BUT my favorite brand is Tetley. In my opinion, it has the best flavor!

To start off, place about 2 cups of your water into a small pot and boil it. Once your water has come to a rolling boil, drop your tea bags in and turn the burner off. Leave your pan on the burner with the burner off for about 10 minutes.

Next, pour your tea into the pitcher you are using, and add in your sugar and the rest of your water. I never measure out my water, I just have a gallon pitcher, so I add in the tea and sugar and then add enough water to fill it up. Stir until your sugar dissolves and you are ready to go! Here is a picture of this goodness over ice:


Don't you want to just drink it off the screen? Your tea should be good in your fridge for about a week or two.

Happy Cooking
& Enjoy!
Tuesday, September 25, 2012

Cinnamon Sugar Grapefruit

Hello everyone and happy Tuesday! The recipe I have for you today is a perfect little meal for mornings when you want something hot for breakfast and you don't have time to make a whole round of bacon & eggs (or tofu & eggs for my vegetarian friends :) ). At first glance, this recipe sounds a little strange... As a lover of all things grapefruit, I rarely meet a grapefruit recipe I am apprehensive about, but this one had me a little scared. Fear Not!! Trust me my friends, this recipe is excellent and will totally turn around your attitude! :)

Ingredients:
1 Grapefruit
2 Tbsp. Butter
1 tsp. Cinnamon
2 Tbsp. Brown Sugar

Turn your oven on to broil and let it heat up while you get your grapefruits ready. Slice your grapefruit in half and place both halves face up in an oven safe pan. In a small bowl, melt your butter and then mix in your cinnamon and brown sugar... your butter mixture should be paste-like at this point (bad analogy I know, but it's effective!). Spread your butter mixture over the top of your grapefruit halves and broil for 6 minutes. Here is what your little beauties will look like before the oven and when they come out:

Before:
 
After:

You should be able to easily scoop out your grapefruit pieces and they will taste awesome! While in the oven the sugars caramelize together making this recipe a vortex of sugary goodness :) Who knew you could get so excited about a grapefruit?!?

Happy Cooking
& Enjoy!
 
Monday, September 24, 2012

New Posting Schedule

Thanks to everyone who has been following the blog! Unfortunately, due to the craziness of school this semester, we are moving to a new posting schedule: Tuesday-Friday. I'm sad to see Monday's go, I'm just not able to get it done until further notice. Don't fret though, the four days left in the week will still be extra special :). See yall tomorrow!
Friday, September 21, 2012

White Almond Cupcakes

TGIF! Who is excited that it's the weekend?! I am! Today I thought we could end the week on a sweet note. These cupcakes are awesome, you are definitely missing out if you have never tried them. I made them for a party with all my grad school peeps and they were a big hit. This recipe is adapted from here. The recipe for almond buttercream icing is at the bottom of this post.

Ingredients:
1 box White Cake Mix (in a later post, I will show you how to do this from scratch)
1 cup Flour
1 cup Sugar
3/4 tsp. Salt
1 1/3 cup Water
1 cup Sour Cream
2 Tbsp. Vegetable oil
1 tsp. Almond Extract
1 tsp. Vanilla Extract
4 egg whites**

**The recipe calls for egg whites because the yolk of the egg would make the color of the cupcakes less white. If you don't care about color, go ahead and throw in the whole egg.

To start off, preheat your oven to 325° and combine your cake mix, flour, sugar, and salt in a large mixing bowl. Next add in your water, sour cream, vegetable oil, almond extract, vanilla extract, and eggs. Beat with an electric mixer on low for 4 minutes (this will make your mix fluffy!). Line your cupcake pans with baking cups (the recipe makes about 30 cupcakes). I usually spray my baking cups with non-stick cooking spray to make the cupcake come out easier but this isn't mandatory.

If you have never learned the cupcake pouring trick, I am here to rescue you. :) If you try and pour your batter directly into the pan you will spill batter everywhere. The trick is to use a cookie dough scoop, or some other type of spoon to spoon your batter into your baking cups. I have included a picture below of the two pans. The one on the left was poured from the bowl and the one on the right was done with a cookie dough scoop.


See how much better your pan looks with the scoop? Using the scoop technique, spoon your batter into your baking cups to almost full (your batter won't expand THAT much, see picture above). Bake your cupcakes for 25-30 minutes. You will know they are done when you insert a toothpick in the middle of one of them and it comes out clean. They will stay fairly white so don't expect them to brown to much. Here is the cupcake after baking:


These cupcakes are good by themselves but I'm a frosting girl and think the almond butter cream really tops these babies off. If you are going to frost them, make sure they are completely cool or your buttercream will melt.

Almond Buttercream Icing Ingredients:
1 stick Butter, softened (leave out for a couple hours or soften in microwave for 15 seconds)
4 cups Powdered Sugar
2-3 Tbsp. Milk
1 tsp. Almond Extract

Combine your butter and powdered sugar in a mixing bowl and beat with an electric mixer until incorporated. Next, add in your milk 1 tbsp. at a time and mix. You want to add in enough to get the right consistency (thick for cupcakes, thinner for a cake) but be careful not to add to much. Finally, add in your almond extract and you are ready to frost!

You don't need a piping bag to frost your cupcakes, just use a zip lock bag and cut the tip off. See this tutorial for more instructions (toward to bottom). You can frost your cupcake in any way you want. I usually use a circular pattern. To make the circular pattern, start in the middle with a dot and then keep going around that dot until you reach the outside of the cupcake. If you don't want to mess with this, just put your frosting on with a knife. :) Here is a picture of your finished product:


Katniss thought they were so good, she passed out at the end of the party.

 
Happy Cooking
& Enjoy!


Thursday, September 20, 2012

Fried Rice

Today we are going to go for something that I was originally scared to make. I LOVE fried rice but I have never made it before, mostly because I don't have a Wok. There is a Thai Chinese restaurant in my home town that I love and always makes me wish I knew how to make fried rice, so I decided to face my fears. Surprisingly, this recipe was A LOT easier than I thought it would be and the rice turned out well. The best part is, it only dirties 1 pan so there aren't many dishes! Feel free to add in your favorite meat if you would like! This recipe is adapted from here.

Ingredients:
3 Tbsp. Sesame oil
1 small onion, diced
2 tsp. minced garlic
1 cup frozen vegetables, thawed (can be any type you want, I used vegetable medley)
3 eggs
3 cups cooked white rice (cook the day before and leave it in the fridge over night for best results)
1/4 cup soy sauce

Tip: You can buy little glass jars of pre-minced garlic at the grocery store. It's not fresh like real garlic but it's a lot more convenient. They even give you a conversion of how much miced garlic is equal to 1 clove.

To start off, pur your sesame oil into a large pan (as wok-like as possible) or wok. Add in your onions and sautee on medium-high heat for 1-2 mintues. Add in your garlic and vegetables and sautee until tender. At this point, your onions should be slightly translucent (see picture below).

Next, push your vegetable mixture over to the side of the pan, and crack your eggs into the remaining space. Scramble the eggs (some veggies may get caught in the eggs, thats ok) and then mix together with the veggies. Here is what this process looks like:


Once you have everything mixed together, add in your rice.


Next, pour your soy sauce over your rice and stir fry until heated through. Here is what your final product should look like:


MMMMMM, looks yummy (it was!). This was enough rice to have dinner and left overs a couple times. It was nice to have a hot lunch to look forward to at work!

Happy Cooking
& Enjoy!!

Wednesday, September 19, 2012

Mashed Potatoes

Today we are going to make something to go along with the Honey Baked Ham we made yesterday. Potatoes are the official taste tester's favorite side dish... He could eat them in any way, shape, or form, so needless to say, we have potatoes frequently. Most people use potatoes from a box which KILLS me because they are SO easy to make yourself. I actually had one guy tell me he liked boxed potatoes better than real potatoes... until he tasted these. I guess he just didn't know what he was missing until I converted him. :) I have to admit, peeling a potato is difficult at first (you may peel off more potato than you have left) but after one mangled potato you should be fine :)

Ingredients:
5 Russet potatoes (medium-large sized)
3 Tbsp. butter
1/2-1 cup milk
1 tsp. salt

To start off, peel the skin off of your potatoes (this is more easily done if you wet the potato before peeling), rinse your potato off, and then cut into 1 inch pieces. This doesn't have to be exact, just try to make your potato pieces relatively the same size. Once you have your potatoes peeled, put them in a pan and cover in water. Here is what my potatoes look like at this point:

 
Bring your potatoes to a boil and boil on medium high for 20 minutes. My stove goes up to 9 and I usually boil them on 7. Once your potatoes are done, pour all the excess water off. Next, beat your potatoes with a hand mixer until smooth. This is an important step because if you don't get all them lumps out here, your potatoes will be lumpy! It usually takes me 1-2 minutes to get all the lumps out on medium beating speed. Here is what my potatoes looked like when smooth:
 
 
Once your potatoes are smooth, add in your butter and allow it to melt. Once your butter has melted, beat your potatoes again to incorporate the butter. Next add in your milk. I would start with 1/2 cup and then add in the rest gradually until the potatoes get to the consistency you prefer. I usually don't use the whole cup of milk but I get close. Also, the longer potatoes sit, the thicker they get, so if you aren't planning on serving your potatoes right away, make them a little more runny on purpose. This will ensure they are still soft when you serve them.
 
Once your potatoes are at the perfect consistency, add in your salt. You may need to add in more if you love salt. I usually just do the taste test method to decide. Here is what your potatoes should look like when they are finished:
 
 
MMMMMMM nice and creamy. Once you get the original recipe down, you can try different variations such as adding in garlic for Garlic Mashed Potatoes!
 
Happy Cooking
& Enjoy!
 
Tuesday, September 18, 2012

Honey Baked Ham


I hope everyone is doing excellently! Sorry about missing the post yesterday, things are getting crazy this semester in school!

Today we are going for a big time recipe. This is what I made for my family on Easter and at a family reunion this summer. It feeds a ton of people and is easy to make... perfect for family gatherings. Only thing to keep in mind, ham's aren't the cheapest food in the world, a 10-12 lb Ham is about $25. With that being said, a family of 5 could probably eat a 10-12 lb Ham for a week!

This is the official taste tester's favorite meal that I make. When he is cutting the ham up, he usually eats more of it than makes it on the plate...sorry honey to reveal that little secret but it's true. Trust me (and him!), this ham is moist and delicious!

Ingredients:
10-12 lb uncooked Ham (don't buy pre-sliced or pre-seasoned, just get a plain old hunk of meat!)
3 Tbsp. Dijon mustard
1 cup brown sugar
1/2 cup honey
1 tsp. cinnamon

Tip: If you have a smaller family, you can buy a smaller ham and this recipe will work just as well. You can still use the same amount of glaze and everything. When it's just me and the official taste tester, I usually get a 6lb ham and we have enough for one meal and left overs for a couple days.

To start off, place your Ham in your roasting pan (if you don't have a roasting pan, a 9x13 pan should work just fine too) and score your ham in a diamond pattern. What does this mean you ask? On the outside part of the ham (where all the fat is) just cut diagonal lines going both ways across your ham (they will look like diamonds). They don't have to be incredibly deep, just about 1/4-1/2 an inch. This allows the fat to render while your cooking it.

Place your Ham in the oven and bake covered for 20 minutes per pound of ham (you will add the glaze on with 45 minutes left). For a 10-12 pound ham this translates to about 4 hours (calculate yours out to get an exact number!) and for a 6 lb ham, its about 2 hours.

To calculate the time exactly, just multiply the weight of your ham by 20 and that should give you the time in minutes you need to cook it for. To put that into hours, just divide by 60. For example, a 10 lb. ham would need to cook for 200 minutes (10 x 20 = 200). This translates to 3 hours and 20 minutes.

When there is 45 minutes left in the cooking time, combine your dijon mustard, brown sugar, honey, and cinnamon all in a bowl. Mix them together and then pour over your Ham. Bake for the remaining 45 minutes and then take out and slice to your preferences. Here are some pictures of my finished product (sorry they are slightly dark):


Happy Cooking
& Enjoy!

For the original post on this ham, go here.
Saturday, September 15, 2012

And the Winner is....

 
The winner of our contest is...

WHITNEY HUGHLETT!!


A picture of her winnings will be posted soon. :) Everyone wish her a congrats! ;)
Friday, September 14, 2012

DIY Fabric Softener


Day 2 of our laundry series and more importantly, it's FRIDAY!!! I will miss you over the weekend, but I do enjoy my time off. Today we will be making Fabric Softener, you can see the Laundry Soap (Day 1) here. This recipe was also sent to me by my Aunt Linda. It's a lot easier to make than the laundry soap. In fact, it takes about 2 minutes or less! Also, the vinegar in it will also help your clothes be cleaner and fresher, so it's a win-win!

Ingredients:
3 cups white vinegar
3 cups cold water
18 oz. Hair conditioner in the scent of your choosing (what do you want your clothes to smell like?)
Bottle for storage (I used an old 2L Sprite bottle and the size was perfect)

Tip: If you can't find that exact size of hair conditioner bottle, just use something around that size. I think conditioner comes in 15 oz. and 22 oz. bottles, either one would work. Also, any type of conditioner will work, I went for the cheapest one I could find!

To start (and finish!) Pour your vinegar, water, and conditioner into your bottle and shake to mix. See? This is so easy! Shake each time before using and use 1/4 cup per load. Here is a couple pictures of the finished product:


I have also included a printable below to use as a label. I applied mine with clear packing tape so that it would be protected from water. Here is a picture of the laundry soap and fabric softener side-by-side, looks pretty snazzy:


ENJOY!!


To use the printable:
1. Right click on picture and select "Copy"
2. In a word document, right click and select "Paste"
3. Size picture to fit your bottle size
4. Print!
 

Thursday, September 13, 2012

DIY Laundry Soap

Happy Thursday! Today begins our 2-part laundry series! This "recipe" was sent to me by my Aunt Linda and she graciously agreed to let me share it with all of you. It costs about $1.66 to make 2 gallons of laundry soap so this is definitely price effective! I also included the cute little printable for your jugs. :)

Ingredients:
1 Bar Fels Naptha Soap
1 cup Borax Powder
1 cup Armor's Washing Soda (Do NOT use Baking soda, its not the same)
1 Gallon Hot water
1 Gallon Cold water
Something to store your laundry soap in. I used 2 Gallon sized jugs, but a bucket or tub would work a lot better!

Tip: At first, I had a hard time finding the first 3 ingredients. Keep searching, they are all right next to each other in the laundry detergent section of Walmart. Here is a picture to make it a little easier:


To make this recipe you need a really big pot! Preferably, use one that holds 2 gallons of liquid. I only had a pot that holds one gallon of liquid, but I made it work!

Finely grate your bar soap. This can be done with a cheese grater or with a food chopper. I started using the grater, but it was taking to long for my liking so I put the bar soap in the food chopper. It worked just as well and was much faster. Also, don't worry about using your kitchen tools for this, since its just soap it washed right off. I had a sink full of hot water while I was working that I just threw the dirty dishes/tools into. By the time I was finished making the soap, all the soap had dissolved off my kitchen tools. Here is what your grated soap will look like:


Place your grated soap into your big pot and add a gallon of hot water. Heat on the stove on medium heat, stirring occasionally, until all your soap flakes have dissolved. Here is what your mixture will look like at this point (you may have a few residual pieces of soap but that's OK):


Add in your Borax powder and washing soda and stir until incorporated. Heat your soap until it starts to boil. If you are using a two gallon pot, you can go ahead and pour your cold water in. If you are like me, you have to be a little more creative. I put half a gallon of water into each of the two containers I was going to use and then divided the soap mixture among them. This worked just as well for me.

Tip: This go around I used two gallon sized jugs, BUT the next time I make this I will use a tub or some type of bucket you can scoop the soap out of. The reason for this is because the soap will coagulate, which makes it a little harder to get it out of the gallon jugs. The jugs are still working, just making things a little harder.

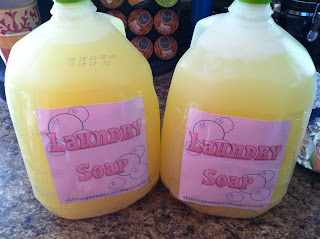
Now you are ready to start washing laundry with your homemade soap! Here is what your final product looks like:


I decided to get a little fancy and add labels to mine. I have included the label as a printable below so you can use it too. :) I attached mine with clear packing tape to protect the paper if the jug got wet (which WILL happen) and it is working well.

 
Use 1/2 cup of detergent per load.
ENJOY!


Tomorrow will be a tutorial for making your own fabric softener so stay tuned!

To use the printable:
1. Right click on picture and select "Copy"
2. In a word document, right click and select "Paste"
3. Size picture to fit your bottle size
4. Print!
 
Wednesday, September 12, 2012

Key Lime Pie

Happy Wednesday! Since we have all made it beautifully through the week so far, lets all share this deliciously delectable piece of pie. :)

Ingredients:
1 cup Shortbread cookies (crushed)
1/2 cup Macadamia Nuts (finely chopped)
1/3 cup Butter, melted
1/4 cup Sugar
8 oz. Cream Cheese (softened)
1 can (14 oz.) sweetened condensed milk
1/2 cup key lime juice or lime juice

Optional Whipped Cream Garnish:
1 cup Whipping Cream
3 Tbsp. Powdered Sugar

Tip: I used my food chopper for both the cookies and the macadamia nuts. Since they both get combined together, you don't have to clean it out in between the two ingredients and it makes things 10x faster!

Tip: The key lime juice is right next to the lime juice in the grocery store and makes this pie taste so much better!

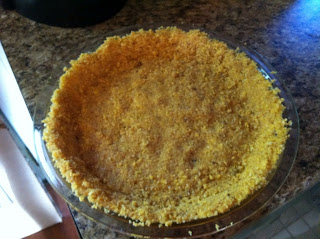
To start off, combine your crushed cookies, finely chopped macadamia nuts, butter, and sugar into a mixing bowl. Once this is mixed, pour it into your pie pan (9 inch) and press it evenly against all sides and the bottom. Refrigerate this for 30 minutes. Here is what my crust looked like:

 
Next, place your cream cheese in a mixing bowl and beat it with a mixer until smooth. If you forgot to take your cream cheese out of the fridge to soften (I do this often!), you can heat it in the microwave for about 15 seconds. Once your cream cheese is smooth, add in your condensed milk and key lime juice. Beat your mixture with a mixer until combined and then pour it into your pie crust. Refrigerate your pie for 4 hours. Here is what your pie should look like:
 

Optional: Whipped Cream Garnish
Directions for making your own whipped cream can be found in an earlier post here. I find that this really takes the pie to the next level, and it just looks awesome. Here is a picture of the final product:

 
Happy Cooking
& Enjoy!

 
Tuesday, September 11, 2012

Parmesan Crusted Tilapia


Sorry about not posting yesterday, I got busy and looked up and it was 10:30 p.m.! I hope you accept my apologies and enjoy this treat I have for you today.

I have to confess, I'm not much of a fish person. I really have to pump myself up to cook and eat it BUT this recipe is pretty good. I think I will be making it quite often! The good thing about it is, none of the ingredients have to be measured out exactly, so you can just use as little or as much as you want.

Ingredients (all are approx.):
3 Tilapia fillets (or however many you are cooking for)
2 Tbsp. butter
Garlic Powder
Parmesan
Parsley

To start off, preheat your oven to 400° and spray a pan with non-stick cooking spray. I used a 13x9, but the size really doesn't matter much, just as long as it's big enough to fit the fillets. Place one of your fillets onto a small plate. Melt your butter and then baste it on one side of your tilapia fillet. I have a basting brush that is really handy for this kind of thing, but if you don't have one you can use a spoon, it will get the job done! Once your tilapia is coated with some butter, sprinkle some garlic powder and parmesan on top. The amount you use is up to you, depending upon how much you like garlic and parmesan... I pretty much covered my fish in it (as you can see below! Place this side face down in your greased pan, and repeat the butter/garlic powder/parmesan combo on the remaining side. Repeat this with your remaining fillets and then sprinkle parsley on top of your fish. Here is what your fillets will look like before they go in the oven:

 
Bake your fillets for 10-12 minutes. Here is what the final product looks like:


They were awesome! I served them with mashed potatoes and asparagus (both coming in later posts) which just completed the meal.

Happy Cooking
& Enjoy!!!
 
 
Friday, September 7, 2012

Pigs in the Blanket


Hey Everyone! I hope you are as excited about the weekend as me! Here is a little recipe for your Saturday morning breakfast. These are great and easy!

Ingredients:
1 package little smokies (I usually get beef, but you can get whatever kind you want)
1 can crescent rolls
Tip: Sometimes, I get little smokies with cheese in them instead of beef!
 
Preheat your oven to 375°. Take your crescent roll and unroll it onto a cutting board. Cut it into 4 pieces. See my picture below for an example:

 
Take a little smokie, and wrap it in a piece of crescent roll. Some pieces may have more breading than others, but that's ok. Place each pig in the blanket on a cookie sheet. It's ok if they are close together because the breading won't expand that much. Here is a picture of mine as I went along:
 
 
Once you use all your ingredients, bake your pigs in the blanket for 11 minutes, or until golden brown. You may have a few little smokies or some crescent roll left, usually mine aren't an exact match. Here is a picture of the final product:
 
 
These are really good by themselves or dipped in mustard or honey. :)
 
Happy Cooking
& Enjoy!