Thursday, October 11, 2012

Pad Thai

I LOVE Thai food.... but I had never made it before and I was scared! Let me assure you, this recipe is easy and tastes pretty good. One thing I may have done differently would have been to add a little more sauce (I have adjusted the recipe accordingly below). Other than that, it was awesome! Read through the directions before you attempt to make this because once you start cooking things will go FAST.

Ingredients:
-16 oz. Wide, Flat Rice Noodles (see picture) - I couldn't find these at Wal-Mart but Target had them, so does Kroger
-water for soaking your noodles in
-2-3 Tbsp. Olive oil
-2 cloves minced garlic (or 1/2 tsp. pre-minced garlic)
-3-4 eggs
-1/4 cup-1/2 cup onions (regular or green onions), diced
-1/3 cup brown sugar
-4 Tbsp. lime juice
-2/3 cup soy sauce
-2 squirts of Sriracha (optional) - this gives your noodles a little more flavor. Trust me, if you don't have any of this stuff, you should get some. I use it ALL the time. Here is a picture to help you find it in the grocery store:

To start off, soak your noodles according to package directions. The brand I used had to be soaked in near boiling for 25 minutes. Here is a picture of mine:


Once your noodles are done soaking and have been drained, combine your brown sugar, lime juice, soy sauce, and Sriracha in a small bowl and set aside. Next, put your olive oil in a large pan or wok and cook your onions and garlic on medium-high heat for about a minute or two. Using green onions is A LOT more authentic but I didn't have any so I just used regular onions and it turned out fine. If you do use green onion, put the white parts in here and add in the green parts when you add in your noodles. Next, crack your eggs into your pan and scramble until they are ALMOST done. In a little while you are going to add them back into your pan and they will cook a little more so you don't want them to be all the way done yet. Here is a picture:


See how they are really soft? Once your eggs are almost cooked, take both your eggs and onions out of the pan and set to the side on a plate. Add your noodles into the pan. Some of the noodles may be stuck together so try to pull them apart. If you don't, the ones that are stuck together won't get done all the way. Saute your noodles in the pan for about 30 seconds-a minute and then add in your sauce and sautee them some more. You want your noodles to be completely covered in sauce and cooked through. This should take about 2-3 minutes. Finally, add in your egg mixture and sautee for about 1-2 more minutes to mix your eggs through out and finish cooking them.

Now comes the best part.... Eating it! Here are some pictures of the final product:


Happy Cooking
& Enjoy!!

This recipe was adapted from here


Wednesday, October 10, 2012

Quick & Easy Alfredo Sauce (with or without Chicken)

So today I thought I'd give you a good recipe that both vegetarians and meat lovers can agree upon. This recipe is really quick and easy to make, and best of all, DELICIOUS! Get cha some of that Alfredo pasta! I'm going to give you this recipe with chicken BUT my veggie friends can simply omit that part.

Ingredients:
For the chicken:
-2 Boneless, Skinless Chicken breasts
-2 eggs (optional)
-1/2 cup milk (optional)
-1 cup flour
For Alfredo Sauce:
-1 stick of butter
-8 oz. cream cheese
-2 tsp. garlic powder
-2 cups milk
-6 oz. grated Parmesan cheese
-Basal, Parsley, Cilantro (optional)
-salt & pepper to taste
-package of your favorite pasta noodles

To start making your chicken, cut your chicken breasts into bite sized pieces. In a bowl, combine your eggs and 1/2 cup milk and mix together. Drop your chicken pieces into your egg wash and then dip into flour. I usually just put my flour in a Ziploc bag, throw my chicken in there, and then shake everything until coated. Also, the egg wash helps hold the flour coating to the chicken better, but if you don't want to mess with this, you can just wet your chicken with water. Once your chicken is ready to go, brown it in a medium non-stick pan that has been sprayed with cooking spray. I like to cover my chicken while it's cooking to help cook the insides. It should look something like this:


Now, it's time to get your Alfredo sauce going. You can set your chicken to the side, you will add it at the end. This is also a good time to start cooking your favorite pasta noodles. They will take about as long as the Alfredo sauce.

In a large saucepan, add your stick of butter and let it melt on medium heat. Then add in your cream cheese and garlic powder and stir until smooth. Your butter and cream cheese may not fully mix together but that's OK. As long as the cream cheese is melted you are good. Next, add in your milk slowly, stirring as you go. This should make your sauce WAY more smooth and creamy. Once your milk has been added and stirred, add in your Parmesan cheese and whisk together. You can also add in your basal, parsley, cilantro, and salt & pepper to your taste preferences. I usually just sprinkle a little bit of spice on top and it is enough. Once your sauce is all melted together, add in your chicken and toss with your favorite pasta. Here is a picture of your finished product:


The official taste tester even requested that we add this to our weekly menu. :)
 
Happy Cooking
& Enjoy!!
 
This recipe was adapted from here

Tuesday, October 9, 2012

Crockpot Apple Crisp


Happy Tuesday everyone!! It's officially Fall here in TX (well as fall as it gets) and so I thought I'd give you an awesome fall recipe to start the week. This recipe will make your whole house smell like fall and it tastes awesome!!

Ingredients:
6 cups apples, peeled, cored, and diced (about 12 small apples)
1 cup flour
1/2 cup brown sugar (light or dark)
1/2 cup & 1/3 cup sugar, divided
1 tsp. Cinnamon (divided in half)
1/4 tsp. nutmeg
pinch of salt
1 stick of butter, softened
1 cup walnuts, chopped
1 Tbsp. cornstarch
1/2 tsp. ground ginger
2 Tbsp. lemon juice (optional)

TIP: The lemon juice keeps the apples from turning brown and make the apples more moist while cooking. You can substitute in lime juice or water if you don't have lemon juice.

To start off, peel core and dice your apples until you have 6 cups (about 12 small apples). I admit, this part takes awhile but it's worth it. Also if you have an apple corer the process go 20x faster. Once you have all your apples cut up, throw them in your crockpot. It should look something like this:


Next, in a separate bowl, mix together 1/3 cup sugar, cornstarch, ginger and 1/2 tsp. cinnamon. Add this mixture to your apples and toss to coat. Next add in your lemon juice (or lime juice or water). and toss your apples to coat. Your apples should look like this:


In a separate large mixing bowl, mix together your flour, brown sugar, 1/2 cup sugar, 1/2 tsp. cinnamon, nutmeg, and salt. Next, add in your butter. You want to mix the butter together with the flour mixture until it is crumbly. You can do this with a fork, but I found it easier just to mash it together with my fingers. Then, add your walnuts into your flour mixture and mix together. Pour your flour/walnut mixture over the top of your apples but DO NOT mix together. You want the flour mixture to sit on top while your apples cook. This is what your recipe should look like at this point:


Cook your apple crisp on low for 4 hours or on high for 2 hours (cooking on low is better!). When there is about an hour left in cooking, partially uncover the top of your crockpot so some air can escape and the top of the apple crisp will harden some. After the 4 hours are over, enjoy!! Here is a picture of the final product (sorry it's so dark, my lighting wasn't very good)


Happy Cooking
& Enjoy!
 
 
This recipe was adapted from here


Thursday, October 4, 2012

Conference - No post today or tomorrow

Hey everyone! I'm at a conference for grad school today and tomorrow so there won't be a post. I will miss y'all this weekend, see ya Monday!
Wednesday, October 3, 2012

Banana Oatmeal Muffins


Happy Hump Day! Today we are going to make a recipe that is great for mornings. I made a batch of these and it was enough for breakfast for me & the official taste tester for the whole week. They aren't overly sweet and the oatmeal in them will keep you going all morning until lunch.

Ingredients:
2 ripe Bananas, mashed
2 eggs
1/4 cup vegetable oil
1/4 cup milk
1 1/2 cup flour
1 cup rolled oats**
1/2 cup sugar
2 tsp. baking powder
1 tsp. baking soda
1/2 tsp. salt

Tip: How do you tell the difference between oatmeals and how do you know if oatmeal is rolled or not? When I was making these muffins, all the different types of oatmeal were confusing to me. After much debate with the official taste tester, I finally figured out to just look at the ingredients on the oatmeal package (they were small but there!)... it should tell you exactly what you need to know. I ended up getting Quaker Old Fashioned Oatmeal, but as long as they are "rolled" it should be fine.

To start off, preheat your oven to 400. Place your eggs in a large mixing bowl and mix with an electric mixer or whisk until frothy. Add in the bananas, vegetable oil, and milk and mix until combined. In a separate bowl, stir together the flour, oats, sugar, baking powder, baking soda, and salt. Once the dry ingredients are combined, slowly mix them into the wet ingredients, just until everything is incorporated. Your batter may be a little lumpy here, but that's OK, you don't want to over mix. here is a picture of what mine looked like at this point:


Next, pour your batter into your cupcake liners, about 3/4 of the way full (makes 15-20 muffins). I usually spray my cupcake liners with non-stick cooking spray because it helps the muffins come out better. Bake your muffins for 16-18 minutes. Here is what they look like when they come out of the oven:


Happy Cooking
& Enjoy!!


Check out the original post here.


Tuesday, October 2, 2012

Hot Italian Layer Bake

How is everyone this mid-week? It's not cold here, but the temperature definitely dropped for fall, so I thought I'd share a hot meal with you. This sub is EASY to put together and tastes great. I made it on a Sunday for lunch and then we had it in our lunches at work the next couple days. It was even better reheated! Only thing about this recipe is, we used meat from the deli which got a little pricey. I think the deli meat tasted awesome, but I'm sure it would be just as good with regular lunch meat and that would cut done on the cost.

Ingredients:
1 can crescent rolls
4 eggs, beaten
1/2 pound turkey (I used cracked pepper turkey, but you can chose any type)
1/2 pound ham
12 slices of hard salami
8 slices Swiss cheese
Optional: Parsley, Basal, Cilantro, & Parmesan for seasoning

Preheat your oven to 350. To start off, place half of your crescent rolls on the bottom of an 8x8 pan and press together. Here is what they should look like:


Next, layer on 1/2 of your turkey, ham, salami, and Swiss cheese. Here is what each step looks like:


Next, pour half of your eggs over your layers and then sprinkle on the seasonings if you are using them. I sprinkled on some parsley, basal, and cilantro at this step as you can see below:
 

Now, repeat your layers of turkey, ham, salami, and Swiss cheese. Then place the remaining crescent rolls on top and smooth together. Pour your remaining eggs on top and then sprinkle some Parmesan over the top for some extra flavor. Here is a picture of mine:


Cover your pan with foil and bake on the middle oven rack for 20 minutes. After that, remove the foil and bake an additional 20-25 minutes until the top is golden brown. Cool for 15 minutes before cutting. Here is a picture of mine when it came out of the oven:


Happy Cooking
& Enjoy!


 You can see the original post here.
Monday, October 1, 2012

Wedding Guest Book


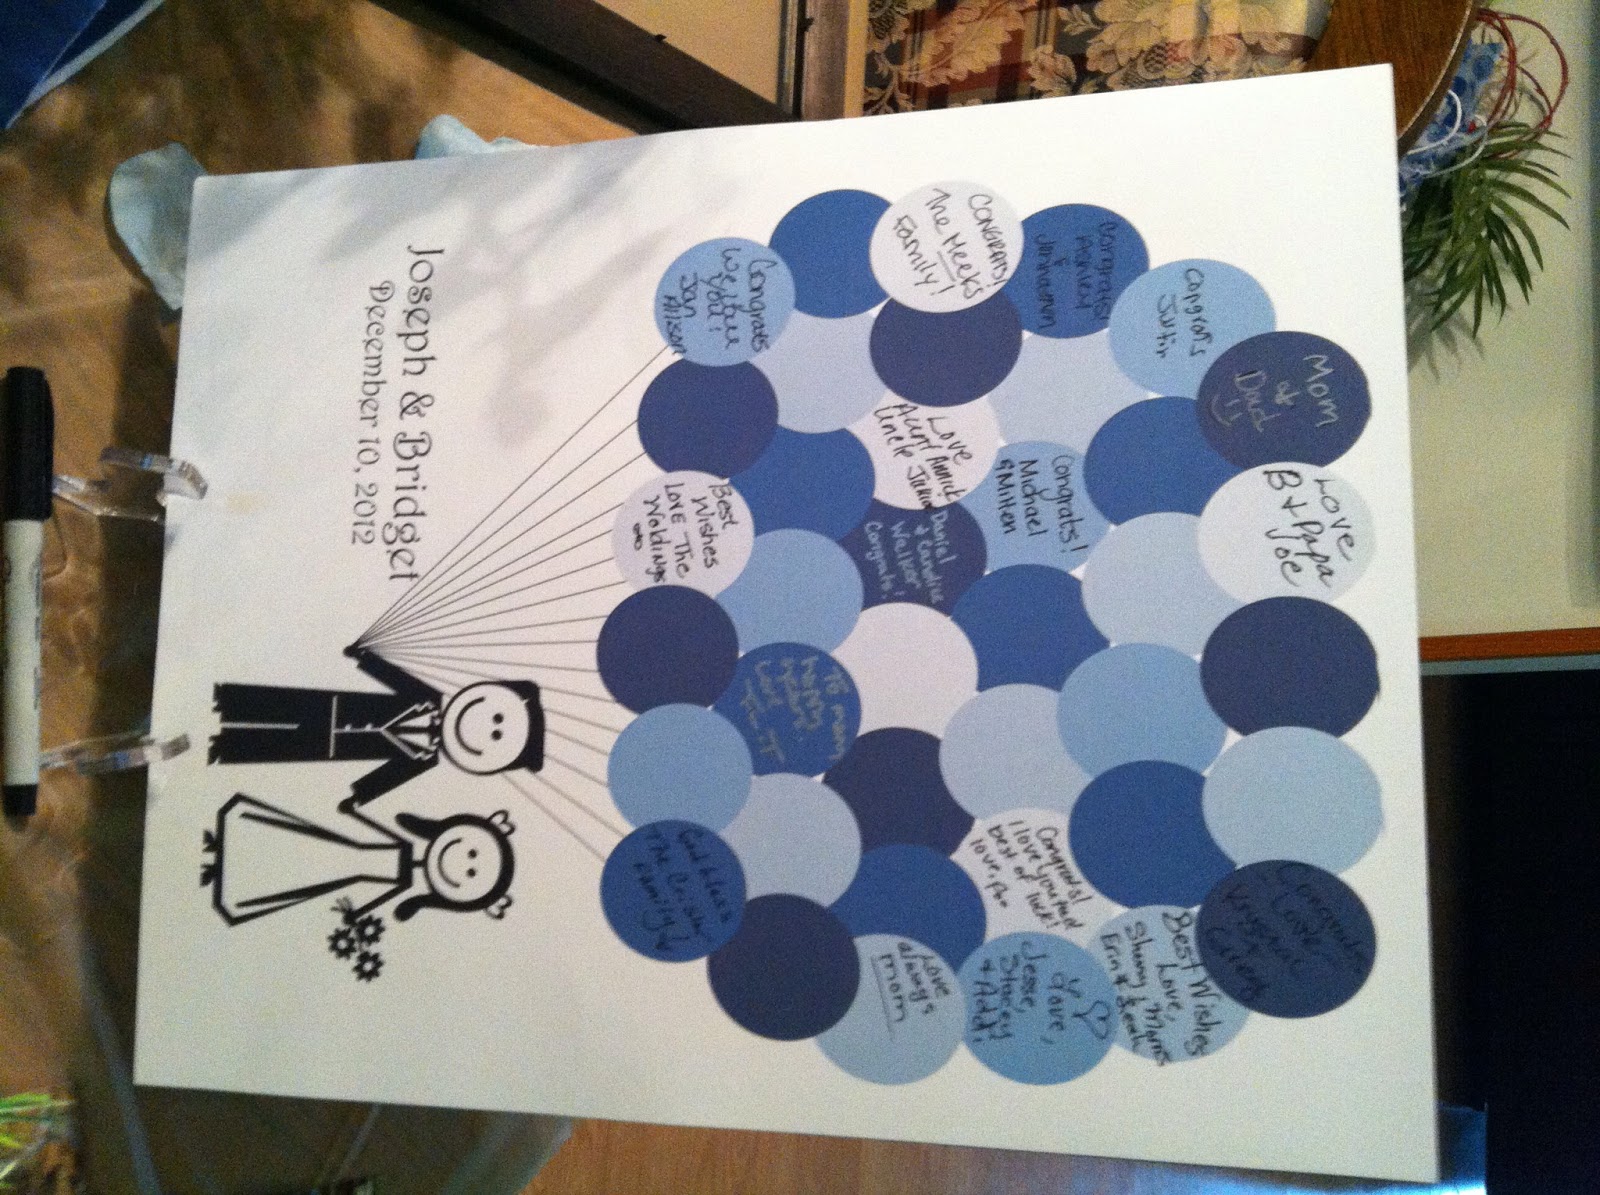
Hey Everyone!! I have been SO excited about this post for a long time, but I wanted to wait until after this Saturday to post it. My brother-in-law is getting married, and this weekend I helped throw him & his fiance a wedding shower. I wanted to make the guest book for their shower really special and something they could keep for a long time, but I wasn't really sure of what to do. At my wedding, I had a thumb print tree as the guest book. I loved it and wanted to give them something just as special, but also something that was unique to them.

I also wanted something that incorporated their wedding colors which were blue. Finally, I came up with the guest book you see above. If anyone wants to try and make this themselves, I did it completely in Microsoft word with shape art and clip art.

If you don't want to make it yourself, I can make you one! Email me at allthingswalkerblog@gmail.com with your colors and your approximate number of guests and we can work out a deal. I can make it, print it, frame it, and even send you the sharpies to go with it! Here is what the guest book looked like as people were signing:

 
I had two different colored sharpies for the different colored balloons and it seemed to be a big hit. After the shower, we put the guest book in a 11x14 frame and now it is something they can have to remember their wedding for many years to come.
 
Happy Crafting!!