Thursday, September 6, 2012

Spanish Rice

I hope everyone enjoyed day 1 of our two day Mexican food series! You can see the recipe for day 1 here. Today, as promised, we will be making Spanish rice. This stuff is easy to make and tastes awesome! Trust me, you will never buy those packages of rice again! This recipe is adapted from All Recipes.

Ingredients:
2 Tbsp. Olive oil
1/2 of an onion, diced (use the whole onion if you LOVE onions like me)
1 1/2 cups uncooked jasmine rice (**see tip below)
2 cups chicken broth
1 cup chunky salsa

TIP: You can really use white or brown or jasmine rice... I just ALWAYS use jasmine rice for everything because it tastes so much better. Seriously, if you have never tried it, you are missing out.

 
To start out, place your olive oil in a large pan (your rice will expand so make sure you have room for this!) and heat on medium. Add in your onions and saute until tender (they start to look slightly translucent). This should take about 5 minutes or so. Here is what mine looked like:
 
Before:

After:
 
Next, add your rice into the pan and saute it just like you did the onions. Do this until your rice starts to turn a slightly translucent whitish color and starts to brown some (the browning is very slight). Here is a picture of mine:
 
 
Next add in your chicken broth and your chunky salsa and stir together. Don't let the fact that there is a lot of liquid scare you, the rice will absorb it all. Here is what your rice should look like after you add the liquids:
 
 
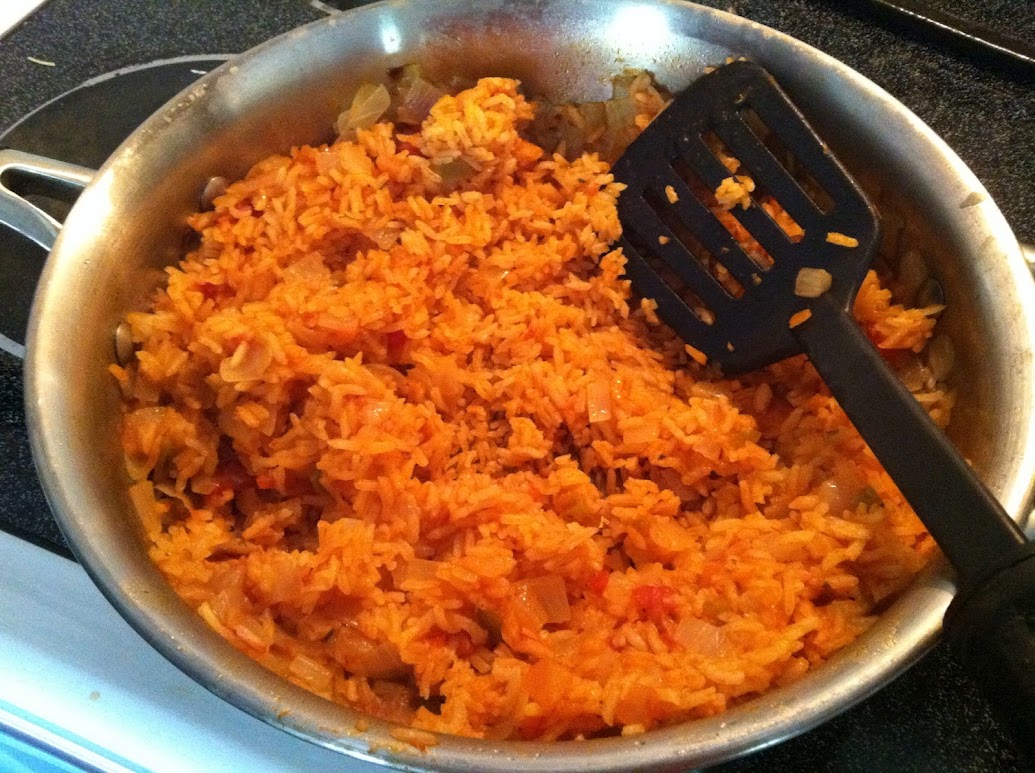
Turn your burner down to low, cover your pan (this is the most important step!) and let your rice simmer for 20-25 minutes. If you notice, this rice has the same cooking time as the enchiladas we made yesterday... they go together like pb & j! Once your rice is done simmering, stir it and try to contain yourself from eating it all at once... or don't! ;) Here is what your final product looks like:
 
 
Here is the rice paired with yesterday's enchiladas, refried beans, & guacamole.
 
 
Happy Cooking
& Enjoy!


Wednesday, September 5, 2012

White Chicken Enchiladas with Salsa Verde Sour Cream Sauce


I hope everyone is ready for two days of Mexican food! Today we will be featuring an EXCELLENT enchilada recipe and tomorrow we will be making Spanish rice. Grab your sombreros and lets get started!

This recipe is my go-to recipe when I'm having a large group of people over. It's easy to make for a lot of people or if you just want some leftovers for the next day. This makes 10 enchiladas which feeds anywhere from 5-10 people. If you need to make more just double the recipe. The original recipe can be viewed here, although, I have made some fairly significant revisions.

Ingredients:
2 boneless, skinless chicken breasts (shredded)
1 1/2 cups shredded Colby Jack cheese (really, any type of cheese would work)
10 flour tortillas (fajita size)
3 Tbsp. Butter
3 Tbsp. Flour
2 cups chicken broth
1 cup sour cream
1/2 cup Salsa Verde
2 cups shredded Monterrey Jack cheese

Tip: To make shredded chicken, boil your chicken breasts on medium-high heat for 15 minutes. Then take two forks and pull your chicken apart between them.

In a bowl, mix together your chicken and Colby Jack cheese. Next, take a tortilla and place about 1/4 cup chicken/cheese mixture onto your tortilla. This doesn't have to be exact by any means! Next, roll your tortilla up and place it into a 9x13 pan sprayed with non-stick cooking spray. Repeat this with the remaining tortillas. Ten tortillas should fit perfectly in your pan (see picture below) Here is a picture of the mixture on the tortilla so you can get an idea of how much I used (sorry it's blurry!).

 
Here is a picture of all my tortillas:
 
 
Next, set your tortilla pan aside and preheat your oven to 425°. While your oven is heating up you can make the sauce for your enchiladas.

In a medium to large sized pan, melt your butter and then whisk in your flour. Cook for 1 minute, stirring frequently. Add in your chicken broth, and whisk until smooth. Cook until the mixture becomes thick and starts to bubble, stirring occasionally. Here is what it should look like at this point:
 
 
Once your mixture is bubbling, add in your sour cream and Salsa Verde sauce, and whisk until smooth. Pour this mixture over your enchiladas and then sprinkle your Monterrey Jack cheese on top. Here is what you enchiladas will look like prior to being put in the oven:
 
 
Cook for 20-25 minutes. Here is what your final product will look like:
 
 
I hope you enjoy them! I paired mine with Spanish rice and refried beans in true Mexican style! Stay tuned tomorrow for the recipe on making Spanish rice from scratch!
 
 
Happy Cooking
& Enjoy!


Tuesday, September 4, 2012

Crockpot BBQ Ribs


I hope everyone had an awesome Labor Day weekend! To kick off your week, I thought I'd give you a simple crockpot recipe that the men (and women!) in your life will LOVE. I was first given this recipe by my sister, and now I make it quite often. This recipe is EASY, only has 2 ingredients, AND the ribs are so tender that they literally fall off the bone.

Ingredients:
1/2 rack of ribs (or however many you can fit in your crockpot)
Bottle of BBQ sauce

To make these ribs, place them in your crockpot, and pour the BBQ sauce over them. Cook them on low for 6-8 hours (depending upon the number of ribs you have) and then enjoy! Here is a picture of my finished product:


Happy Cooking
& Enjoy!
Monday, September 3, 2012

Labor Day

 
I hope everyone enjoys Labor Day! There will not be a post today in honor of this MUCH NEEDED holiday, but we will see you back tomorrow!

Take some time off my friends, you deserve it!

Friday, August 31, 2012

Breakfast Quesadilla


Breakfast Quesadillas are something my mom always used to make for us before school in the morning. I carried on the tradition and make these for the official taste tester and myself in the mornings before work and school. They are easy to make and don't take up a lot of time. This recipe is for 1 quesadilla, which we usually split, but you can double or triple the recipe easily.

Ingredients:
2 tortillas (I usually use the small ones, but you can use whatever size you want)
3-4 eggs (depending on your tortilla size)
3 strips of turkey bacon
1 slice of cheese
1/8 cup shredded cheese

Tip: This recipe can be customized however you want! I used turkey bacon because it's the official taste tester's favorite BUT you can use regular bacon or even 1/4 lb of sausage (or both if you are a meat lover). You can also add some veggies into your quesadilla if you chose. I bet some onions, tomatoes, and bell peppers would make this recipe even better! Basically, just use whatever you have in your kitchen.

To start off, cut up your bacon and cook in a pan sprayed with non-stick cooking spray over medium heat. I usually just get a pair of scissors (a pair I keep in the kitchen and use only for food) and cut all the bacon strips up at once right into the pan, its so much easier and quicker! Cook the bacon for about 2-3 minutes (if you use regular bacon, you need to cook it longer... Basically, cook it until its done enough that you would feel comfortable eating it). Here is a picture of my bacon prior to cooking (see how easy it is to cut with scissors?):


While your bacon is cooking, crack your eggs into a bowl and beat them with a fork or a whisk until the yellow and white is combined fairly evenly. Once your bacon is done, add your eggs to the pan and scramble them. I also usually add in a little bit of butter for some extra flavor before I put in my eggs but that it completely optional. Here is what your eggs should look like when finished:
 

Once your eggs are done, take them out of the pan and set aside. For this next part, I usually use my stove-top griddle but you can use a regular pan if you don't have one (I do use my stove top griddle ALL THE TIME though so I would definitely recommend purchasing one). Spray your griddle (or pan) with non-stick cooking spray or give it a fine coat of butter. Then lay your tortillas down and brown them over medium heat. Once the first side is browned, flip them over and assemble your quesadilla while the other side is browning. To start the assembly, take your slice of cheese and put it in small pieces onto one of your tortillas. My cheese is usually in about 6-7 pieces when I do this. Next, spoon your cheese and bacon mixture onto the tortilla and spread it out evenly. Finally, top your egg mixture with your shredded cheese and remaining tortilla. Here is a picture of mine fully assembled:

 
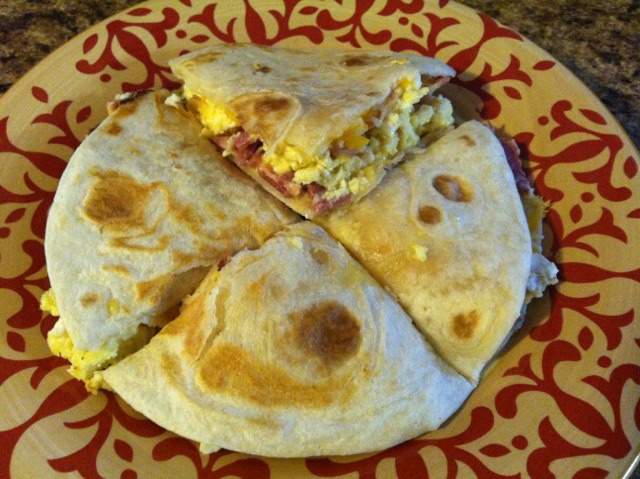
I didn't take any pictures of the assembly process because it goes to quickly to stop and snap a picture. I usually cut my quesadilla up with a pizza cutter into fourths. Here are some pictures of the final product:


This tastes great by itself or with some picante sauce.
 
Enjoy &
Happy cooking!
 
Thursday, August 30, 2012

Crispy Cheddar Chicken


Hey everyone! I hope you are having a good week so far. I always love to add recipes to my recipe box that are easy and everyone loves. I have one of those here for you today. You can read the original post here.

This recipe is easy to put together and tasty :) I hope you enjoy it! This version feeds two people, but this recipe is really easy to double/triple to fit your needs

Ingredients:
2 Boneless, Skinless Chicken Breasts
1/2 sleeve Ritz crackers, smashed into crumbs
1/2-1 cup shredded cheese of your choosing
Milk
Dried Parsley
1 can Cream of Chicken Soup
2 Tbsp. Butter
2 Tbsp. Sour Cream

Tip: The easiest way to crush your crackers is to put them in a food chopper. If you don't have one of those, you can put your crackers into a ziplock bag and crush them with a meat tenderizer (spike side up!) or with a small pan by beating them.

To start off, preheat your oven to 400°. Place your chicken on a plate or in a bowl and pour enough milk over it to wet it. This doesn't have to be exact and you can't really use to much milk, the extra will just drip off. This is how I did it:

 
Next, place your cheese and cracker crumbs onto separate plates. Take one of your chicken breasts and dip it into your cheese and then dip it into your cracker crumbs. Once your breast is coated, place it in a pan that has been sprayed with non-stick cooking spray and repeat with your remaining chicken breast. Here are some pictures of my chicken as I went along.
 
Chicken covered in cheese
 
Chicken covered in cheese and cracker crumbs (crumbs should fill in the spaces between the cheese)
 
Chicken in the pan before cooking
 
Tip: Some of your crackers and cheese will fall off. To make my chicken a little better, I sprinkled some of the left over cheese and crackers onto the top of each chicken breast.
 
Once your chicken is in the pan, sprinkle some dried parsley on top. Cover your pan with aluminum foil and bake for 35 minutes.
 
When your chicken has about 5 minutes left, place your cream of chicken soup into a medium sized stove-top pan. Mix in the butter and sour cream and heat on medium heat until warm. Serve this sauce over your chicken to give it a little something extra. Here is a picture of my chicken right when it came out of the oven:
 
 
Adding some veggies on the side gives your dish some color and makes the dinner healthier!Here is a picture of my chicken with the sauce and the veggies I served with it.
 
 
Enjoy &
Happy Cooking!


Wednesday, August 29, 2012

Guacamole


I love avocados. THEY ARE SO GOOD. With my love of avocados, comes a love a guacamole, so I thought I'd share a quick recipe. This recipe is single serving, but if you want to feed a crowd, just double, triple, etc. the recipe.

Ingredients:
1 avocado
1/4-1/2 tsp. garlic powder (depending upon how much you like garlic)
salt & pepper to taste
Optional: small roma tomato, diced
Optional: 1/8 cup onions, diced

Tip: Most avocados you buy in the store aren't ready to eat yet. Generally, the darker in color an avocado is, the closer it is to being ready. Also, a ripe avocado should have some squish! What I mean is, you should be able to apply some very light pressure to the avocado and feel it squish in (think dent). If your avocados aren't ready, your guacamole will be AWFUL so make sure you get a good avocado. Here is a picture of the inside of the little beauty I used, it was perfectly ripe. Also note the outside, its almost black.


To start off, cut your avocado in half and remove it from the skin. It should easily come out of the skin if it's ripe enough. Next place your halfs on a plate and smash them up with a fork. This part will be difficult if your avocado isn't ripe enough. It should go something like this:

Once you have your avocado smashed, it should look like this:


Next, sprinkle your garlic salt on top. I also usually sprinkle some salt and pepper on, but be careful, it's really easy to oversalt your guacamole. At this point you can also add in the tomatos and onions if you choose. I think those two ingredients take this recipe to the next level but it's still good without it. I did't put any in this batch because the official taste tester likes his guacamole plain, but I personally prefer it with the additional veggies.

Once you have everything mixed together, that's it! Take your favorite bag of chips and chow down! Here is a picture of the final product:


Enjoy
& Happy Cooking!