Monday, August 20, 2012

Coronarita

After a hard Monday's work you may need a drink at 5 to take the edge off. :) In the Walker house, we are Margarita junkies. We just can't help it, that's our drink of choice. When I stumbled upon this little recipe on Pinterest I knew I was in trouble. You can read the original post here. The first time I made this I followed the recipe exactly and it was OKAY. I tweaked a few things and it was AWESOME. :) Be careful, these are dangerous!

Ingredients:
1 can Frozen limeade concentrate
Tequila (use limeade can to measure)
Sprite
Water
Coronas (I usually use the smaller Corona bottles but if you use a bigger glass you can use the bigger Corona)
Optional: Margarita Salt

In a drink pitcher, add the can of frozen limeade concentrate. Then take your limeade can, fill it up with tequila and add it to the pitcher. Do the same thing with Sprite. Next, take the can and fill it half way with water and add that to the pitcher. Mix everything together until the limeade is thoroughly dissolved.

Take your cup and salt the ring with margarita salt. The way I have found that works best for this is to dip the rim of the cup into the margarita mixture and then into the salt.

Once your cup is salted, fill your cup 1/2-3/4 full of margarita mix. Then open your corona and quickly invert the bottle into your cup of margarita mix. This may take some practice... the first time I did it I had added to much margarita mix and my cup over flowed slightly. Each batch makes about 4 coronaritas.

Next, ENJOY! Like I said, these are dangerous so be careful. Here is a picture of the finished product:

CONTEST TIME!!

THIS CONTEST IS CLOSED!

Thank you to everyone who has been following the blog! :) It really makes me happy. I think to spread our fan base a little more, it's time for a contest. LET'S GET EXCITED!!!

The prize for the contest will be: A Cooking Gift Basket with a ton of goodies :)

There are 2 steps to enter the contest:
1. Sign up to be a follower of the blog. You do this by clicking "Join this site" on the main home page (see picture below). You can also follow us on Facebook!

2. Refer people to the blog. Have your friends leave a comment on any post with the name of the person that referred them OR you can share our Facebook page and have people leave a comment on our wall.

The person with the most referrals wins!
Friday, August 17, 2012

Mellark Peanut Butter Fudge

Day 5 of our week long Hunger Games series :) T minus 1 day until the release of the first Hunger Games DVD!

Who is going to get the DVD at midnight?! ME!!

Click here to see Day 1.
Click here & here to see Day 2.
Click here to see Day 3.
Click here to see Day 4.

This recipe is pretty awesome. I have never made fudge before so I was nervous, but this recipe can be made by anyone, especially when channeling the Mellark bakery :). It's probably the easiest dessert with the fewest ingredients that I have ever seen. It takes about 10 min to make and has been described as "peanutbutterlicious" by the official taste tester.

Ingredients:
2 cups sugar
1/2 cup milk
1 tsp. Vanilla
3/4 cup Peanut Butter

Stir your milk and sugar together in a pan and place on the stove. The mixture should be a white-ish color (see picture below)

Next, set your stove temperature at the lowest temp possible that is still hot enough to boil the sugar mixture. My stove goes up to "9" and I put it on "4". This step is REALLY important because it's really easy for sugar to burn. Cooking it to fast will be detrimental to your fudge.

While your sugar mixture is in the early stages of heating (or before you start), mix your peanut butter and vanilla together in a separate bowl and set aside. It's important to have this prepared before your sugar mixture starts boiling because once that happens you won't have time to mix it up.

Stir your sugar mixture frequently while it is heating up. Once it starts boiling, it should look like this:

Let the mixture boil for 2 1/2 minutes and then remove from heat. The longer it boils, the clearer the mixture will get. Once you remove the sugar mixture from the heat, immediately add the peanut butter and vanilla mixture and stir until fully integrated. Next place you fudge into the pan you want to keep it in. The fudge will set pretty quickly so do this as fast as possible. The key to this recipe is TIMING!

Let the fudge cool before cutting it up or it will break into pieces. Here is what the finished product looks like:


Now that's something Peeta would be proud of. I'd say he would even burn a little so he could give it to Katniss :)

Happy cooking & may the odds be ever in your favor!

Thursday, August 16, 2012

Capital-Grade Chocolate Cake

Day 4 of our week long Hunger Games series :) T minus 2 days & counting until the release of the first Hunger Games DVD!

Click here to see Day 1.
Click here & here to see Day 2.
Click here to see Day 3.
Click here to see Day 5.

This recipe was taken and adapted from the Unofficial Hunger Games Cookbook. :) It really is probably the easiest "from scratch" cake you could ever make... Maybe that is because the people at the Capital are always pressed for time. Either way, it's definitely capital-worthy!

For those of you who are big-time fans, you will know that chocolate cake is what Katniss had her first night away from her family after the reaping. I hope you enjoy it's decadence as much as she did!

Ingredients:

Cake:
2 cups all-purpose flour
2 cups sugar
1 cup unsweetened cocoa powder
2 tsp. baking soda
1 tsp. baking powder
1/2 tsp. salt
2 eggs
1 cup cold brewed coffee
1 cup buttermilk
1/2 cup vegetable oil

Icing:
1 stick of butter (softened)
2 1/4 cups powdered sugar (confectioner's)
1/2 cup unsweetened cocoa powder
1/4 tsp. vanilla
1/4-1/2 cup milk

Preheat your oven to 350° and spray a 9x13 pan with non-stick cooking spray. In a large bowl, mix together your flour, sugar, cocoa powder, baking soda, baking powder, and salt until incorporated. Make a well in the middle of your dry ingredients (basically just make a hole in the middle) and pour your eggs, coffee, buttermilk, and oil into it. Mix your ingredients together with a spoon until smooth and then pour into your pan. Bake for 35-40 minutes or until a toothpick inserted into the middle of the cake comes out clean. Here is a picture of what mine looked like when finished:


Don't worry if the middle sinks down a little, you can cover that up with frosting. :) Wait until your cake has cooled completely to frost it or your cake will crumble AND your icing will melt!

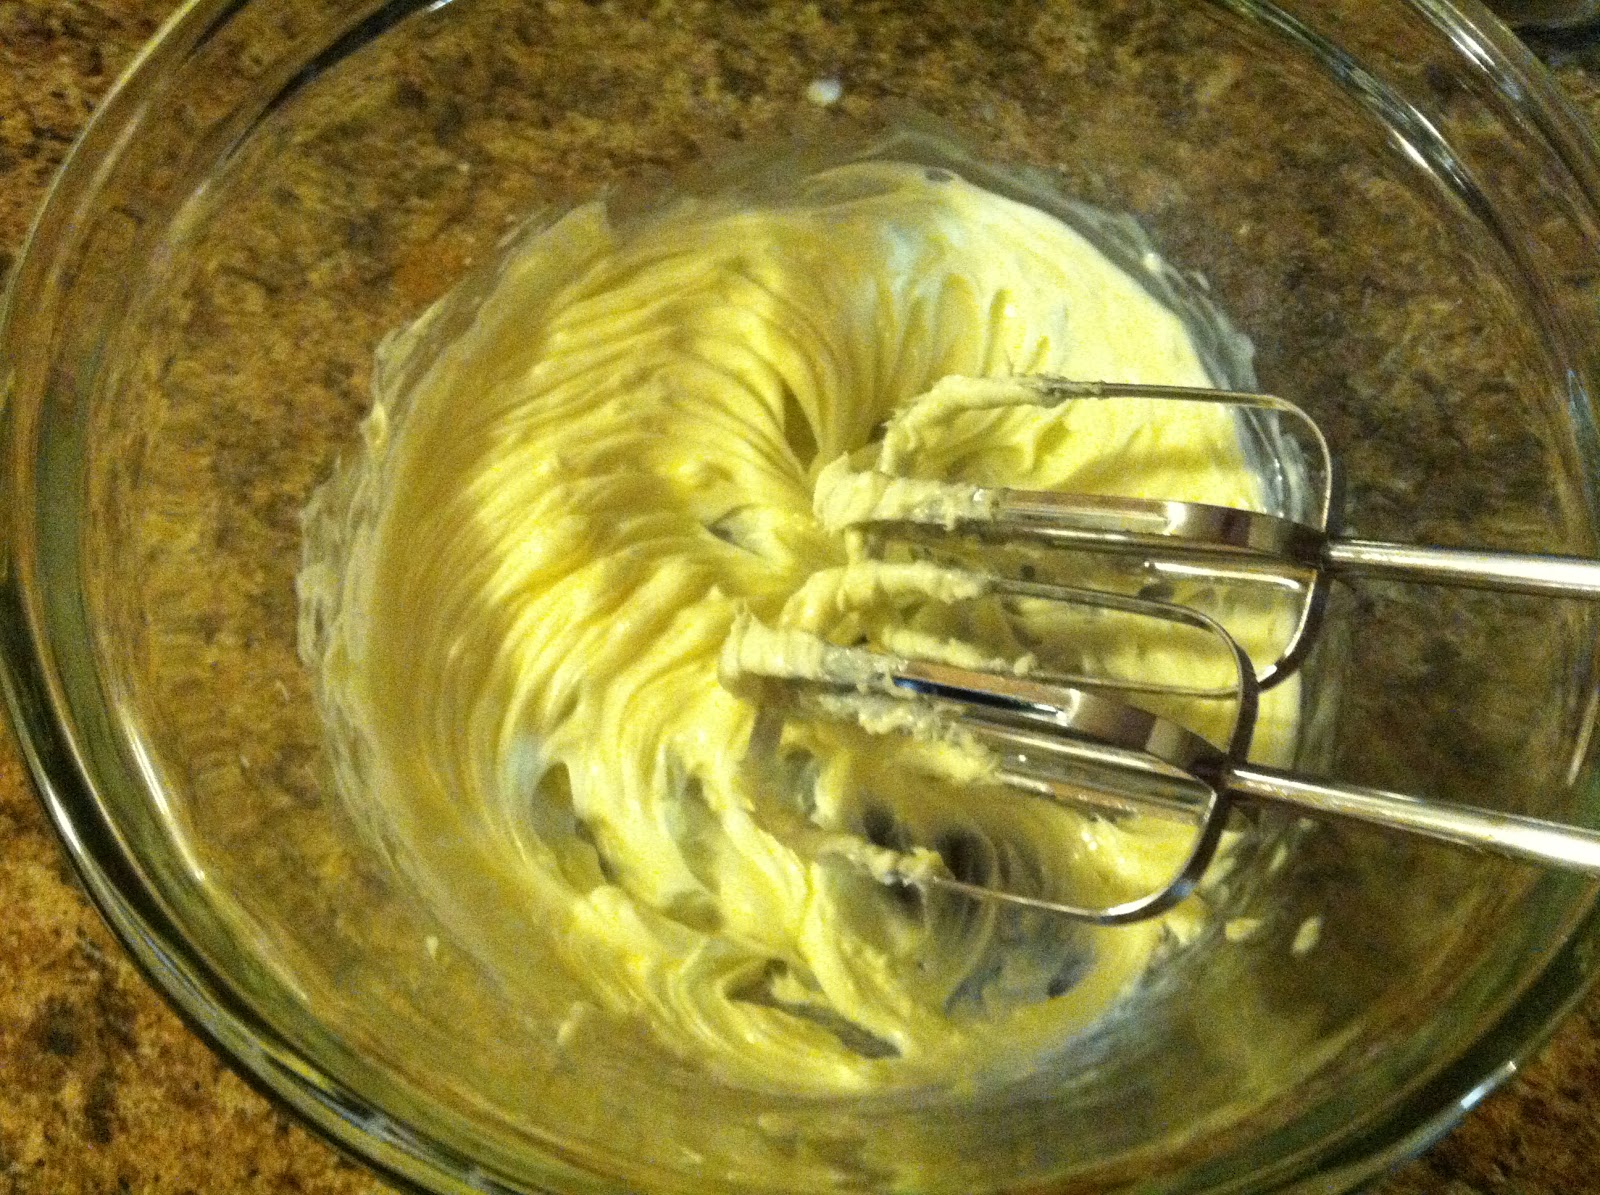
To make the icing, place your butter in a medium sized mixing bowl. If you need to soften your butter in a hurry, you can heat it in the microwave for 15 seconds. With a hand mixer, beat your butter on medium speed until creamy. If you are not sure what creamy butter looks like, take a look at my picture:


Next, reduce your mixing speed to low and add in the powdered sugar, cocoa and vanilla. Your frosting should be somewhat crumbly at this point. Finally, add in your milk slowly until your frosting is at the consistency and thickness that you want. Using 1/4 cup of milk will make your frosting thick like paste and 1/2 cup will make it fairly thin. I used 1/2 cup but you can make your frosting however you would like. Here is a picture of the finished product:


See? I told you that was easy!

Tip: If you want, you can make your cake in two 8 inch round pans and then stack them. If you do this, you will need to double or triple your frosting mixture.


Happy cooking & may the odds be ever in your favor!
Wednesday, August 15, 2012

"Lamb" Stew with Dried Plums

Title say whaaaaaaaaaaaaat? Soup with lamb and fruit?! Yes, you read correctly. Don't turn away just yet... let me convince you as to why you should read this and make this!

1. It's Hunger Games week and this is Katniss's favorite food
2. It's actually pretty good :)
3. I used Pork instead of Lamb
Come on everyone! Get in the spirit and make an authentic Hunger Games dish! It will make your viewing so much better :)

Day 3 of our week long Hunger Games series :) T minus 3 days & counting until the release of the first Hunger Games DVD

Click here to see Day 1.
Click here and here to see Day 2.
Click here to see Day 4.
Click here to see Day 5.

Before we get started... I realize using pork is not as authentic as lamb BUT the town I live in does not have something that exotic in the grocery store AND lamb is expensive (like $30 a lb)!!!! The recipe is still awesome, believe me, the official taste tester was asking for seconds. It's exotic, creamy, and filling all at the same time! If you want to use lamb, you can see the original recipe here.

Ingredients:
2 - 2 1/2 lbs Pork Shoulder or Pork Loin, fat trimmed off
1/2 cup flour (this doesn't have to be exact)
3 Tbsp. Olive Oil
1 small onion, finely chopped
1/2 cup carrots, finely chopped
1 tsp. cinnamon
1/2 tsp. ground ginger
1/2 tsp. ground cumin
1/2 tsp. black pepper
1 tsp. salt
3 cups chicken stock
2 sweet potatoes, peeled and cut into cubes
1/2 cup dried plumbs, diced
1/4 cup dried apricots, diced
1/4 cup golden raisins
6 fresh mint leaves, diced (optional)

To start off, you are going to want to use a large stock pan or dutch oven that is both stove top and oven safe. This is the best method because you don't have to transfer between pans BUT if you don't have a pan that can be used for both, you can use separate pans and then transfer your stew.

Preheat your oven to 325°. Take your pork and cut it into small squares (mine were about an inch thick). Once your pork is cut up, grab a gallon size zip lock bag and throw your flour and pork into it. The amount of flour you use does not have to be exact, just use enough to coat your pork. Close your bag and shake it to coat your pork in flour. Throw the excess flour away.

Next, heat your olive oil in your pan on medium heat. Once heated, drop your pork in a single layer into the olive oil and brown for about 1 minute on each side. You will have to do this in batches because your pork won't fit in at one time. Also, the more batches you do, the thicker your oil will get (from the flour). If needed, add more oil. At one point, my oil was so thick that I just dumped it out and started with fresh oil which is also ok. Here is a picture of what your pork will look like after browning:


After all your pork is browned, remove it from the pan and set it aside. Toss your carrots and onions into your pan and cook for 3-5 minutes or until tender. To save time (and because I'm lazy), I used my food chopper to cut up my carrots and onions but you can do them by hand if you don't have one. Once your carrots and onions are cooked, the onions should have an orange tint to them from the carrots. Here is a picture of mine:


Once your carrots and onions are ready, add in your cinnamon, ginger, cumin, black pepper, and salt and then stir to coat. Add your pork back in and stir it up again, and then add in your chicken stock and stir it up again. Turn your stew down to medium-low and bring it to a simmer. Then, place your stew (covered) on the middle oven rack and cook for 1.5 hours. If you don't have a cover for your pan, you can use a piece of foil.

I took this hour and a half to clean up from the first round of the stew and cut up my sweet potatoes and dried fruits (and watch a little TV!). I was lazy again with the dried fruits so I put them in the chopper. You can't really do that with sweet potatoes so I had to do it by hand. Try and make sure your sweet potato cubes are about the same size so that they will cook evenly. My cubes were about 1/2 inch on all sides, but you can make yours smaller if you want. Here is a picture of what my dried fruits look like, chopped and ready to go:

Once your stew has finished cooking, add in your sweet potatoes, dried plums, dried apricots, and raisins and return the stew to the oven. If your sauce is thicker than you would like, add a little water into your stew. I added in about 1/2 a cup of water to mine. Cook for 25 more minutes. Once your stew is done, remove it from the oven and add in your mint.
I served my stew over hot buttered noodles and I think that really set off the dish. To do this, just boil some noodles of your choosing, drain them and coat in some butter. Here is a picture of the dish over noodles:
Happy cooking and may the odds be ever in your favor!

Tuesday, August 14, 2012

District 13 Bread (Biscuits)

Day 2 of our week long Hunger Games series :) T minus 4 days & counting until the release of the first Hunger Games DVD

Click here to see Day 1.
Click here to see Day 3.
Click here to see Day 4.
Click here to see Day 5.

What is something that all the districts have but that is also unique to each district?
-10 reaping slips to you if you guessed bread. This recipe is pretty great considering most things in District 13 are pretty bland.  If you did not know there was a District 13, go read books 2 & 3! You can see the original post here. There is also a pretty awesome cinnamon butter spread to go along with it that you can find here.

Ingredients:
3 cups flour (I used half wheat flour & half all purpose white flour, but you can use any combo)
1 1/2 tsp. salt
1 Tbsp. sugar
1 1/2 tsp. baking powder
1 stick butter (room temperature)
3/4 cup buttermilk
1 egg
1/4 cup water

Preheat your oven to 425°. Mix your flour, salt, sugar, & baking powder together until incorporated. Add in your butter and mix until crumbly (I used a hand mixer for this). If you forget to let your butter get to room temperature, you can zap it in the microwave for 15 seconds. Next, mix in your buttermilk, egg, and water with a spoon until just incorporated. Do not use the hand mixer for this or over mix with your spoon because it will make your dough flat. I used my hands to mix this up all the way.

By this time you should have a nice little ball of dough. Place your dough ball onto a floured cutting board and roll it out with a rolling pin to about 1 inch thickness! It's important to not make your dough too thin because your biscuits will not rise very much in the oven. Keeping them thick ensures they are soft and fluffy. Here is a picture of my dough rolled out:


Once you roll your dough out, find something to cut it into circles that is about 2 inches in diameter. I used a cup. You will have extra dough left over after you cut out your circles but you can just smash it back together, roll it out again, and cut out more biscuits. Repeat until you are out of dough. Place your biscuit circles, touching each other, onto a greased cookie sheet. Here is what mine looked like right before I tossed them in the oven (the one in the top right corner was the last bit of left over dough that I molded into it's own biscuit):


Cook for 12-18 minutes. Yes, I know, that's a very large range, but how fast bread cooks is completely dependent upon your oven (how slow or fast it cooks). I set mine for 12 minutes and then checked them and added 2 minutes at a time until they were golden brown on top. It ended up being 18 minutes total. Here is the finished product:


This recipe makes about 10 biscuits depending upon how thick you make them.

Happy cooking & may the odds be ever in your favor!

Cinnamon Butter

This stuff is awesome and  goes perfectly with our District 13 Bread (biscuits). Check it out!

Ingredients:
1 stick of butter (room temp)
1/4 cup honey
1/4 cup powdered sugar
1 tsp. cinnamon

Place your room temperature butter in a bowl and beat with a hand mixer for 30 seconds. If you don't have a hand mixer you can use a whisk for 1-2 minutes.

**TIP: If you forget to set out your butter and it's still cold you can heat it in the microwave for 15 seconds.

Next, add in your honey, powdered sugar, and cinnamon. Beat with hand mixer for 2 minutes or until butter becomes fluffy (If you use a whisk this will take about 4 minutes). That's it! Pretty easy huh? This keeps excellently in the fridge for a month or two and is great on pretty much everything!

Here is a picture of what your final product will look like:


Happy cooking & may the odds be ever in your favor!