Friday, August 31, 2012

Breakfast Quesadilla


Breakfast Quesadillas are something my mom always used to make for us before school in the morning. I carried on the tradition and make these for the official taste tester and myself in the mornings before work and school. They are easy to make and don't take up a lot of time. This recipe is for 1 quesadilla, which we usually split, but you can double or triple the recipe easily.

Ingredients:
2 tortillas (I usually use the small ones, but you can use whatever size you want)
3-4 eggs (depending on your tortilla size)
3 strips of turkey bacon
1 slice of cheese
1/8 cup shredded cheese

Tip: This recipe can be customized however you want! I used turkey bacon because it's the official taste tester's favorite BUT you can use regular bacon or even 1/4 lb of sausage (or both if you are a meat lover). You can also add some veggies into your quesadilla if you chose. I bet some onions, tomatoes, and bell peppers would make this recipe even better! Basically, just use whatever you have in your kitchen.

To start off, cut up your bacon and cook in a pan sprayed with non-stick cooking spray over medium heat. I usually just get a pair of scissors (a pair I keep in the kitchen and use only for food) and cut all the bacon strips up at once right into the pan, its so much easier and quicker! Cook the bacon for about 2-3 minutes (if you use regular bacon, you need to cook it longer... Basically, cook it until its done enough that you would feel comfortable eating it). Here is a picture of my bacon prior to cooking (see how easy it is to cut with scissors?):


While your bacon is cooking, crack your eggs into a bowl and beat them with a fork or a whisk until the yellow and white is combined fairly evenly. Once your bacon is done, add your eggs to the pan and scramble them. I also usually add in a little bit of butter for some extra flavor before I put in my eggs but that it completely optional. Here is what your eggs should look like when finished:
 

Once your eggs are done, take them out of the pan and set aside. For this next part, I usually use my stove-top griddle but you can use a regular pan if you don't have one (I do use my stove top griddle ALL THE TIME though so I would definitely recommend purchasing one). Spray your griddle (or pan) with non-stick cooking spray or give it a fine coat of butter. Then lay your tortillas down and brown them over medium heat. Once the first side is browned, flip them over and assemble your quesadilla while the other side is browning. To start the assembly, take your slice of cheese and put it in small pieces onto one of your tortillas. My cheese is usually in about 6-7 pieces when I do this. Next, spoon your cheese and bacon mixture onto the tortilla and spread it out evenly. Finally, top your egg mixture with your shredded cheese and remaining tortilla. Here is a picture of mine fully assembled:

 
I didn't take any pictures of the assembly process because it goes to quickly to stop and snap a picture. I usually cut my quesadilla up with a pizza cutter into fourths. Here are some pictures of the final product:


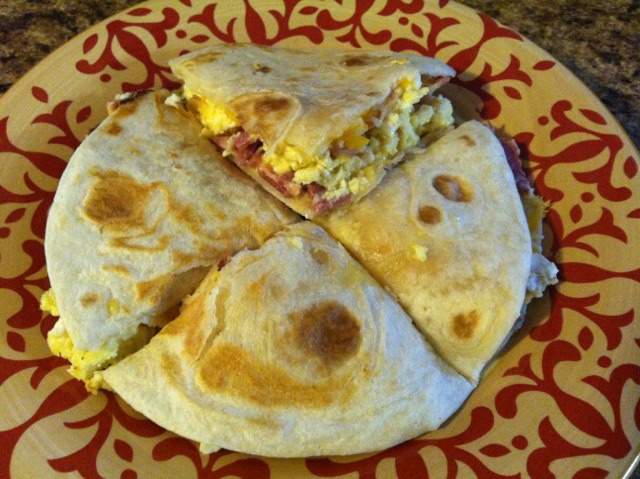
This tastes great by itself or with some picante sauce.
 
Enjoy &
Happy cooking!
 
Thursday, August 30, 2012

Crispy Cheddar Chicken


Hey everyone! I hope you are having a good week so far. I always love to add recipes to my recipe box that are easy and everyone loves. I have one of those here for you today. You can read the original post here.

This recipe is easy to put together and tasty :) I hope you enjoy it! This version feeds two people, but this recipe is really easy to double/triple to fit your needs

Ingredients:
2 Boneless, Skinless Chicken Breasts
1/2 sleeve Ritz crackers, smashed into crumbs
1/2-1 cup shredded cheese of your choosing
Milk
Dried Parsley
1 can Cream of Chicken Soup
2 Tbsp. Butter
2 Tbsp. Sour Cream

Tip: The easiest way to crush your crackers is to put them in a food chopper. If you don't have one of those, you can put your crackers into a ziplock bag and crush them with a meat tenderizer (spike side up!) or with a small pan by beating them.

To start off, preheat your oven to 400°. Place your chicken on a plate or in a bowl and pour enough milk over it to wet it. This doesn't have to be exact and you can't really use to much milk, the extra will just drip off. This is how I did it:

 
Next, place your cheese and cracker crumbs onto separate plates. Take one of your chicken breasts and dip it into your cheese and then dip it into your cracker crumbs. Once your breast is coated, place it in a pan that has been sprayed with non-stick cooking spray and repeat with your remaining chicken breast. Here are some pictures of my chicken as I went along.
 
Chicken covered in cheese
 
Chicken covered in cheese and cracker crumbs (crumbs should fill in the spaces between the cheese)
 
Chicken in the pan before cooking
 
Tip: Some of your crackers and cheese will fall off. To make my chicken a little better, I sprinkled some of the left over cheese and crackers onto the top of each chicken breast.
 
Once your chicken is in the pan, sprinkle some dried parsley on top. Cover your pan with aluminum foil and bake for 35 minutes.
 
When your chicken has about 5 minutes left, place your cream of chicken soup into a medium sized stove-top pan. Mix in the butter and sour cream and heat on medium heat until warm. Serve this sauce over your chicken to give it a little something extra. Here is a picture of my chicken right when it came out of the oven:
 
 
Adding some veggies on the side gives your dish some color and makes the dinner healthier!Here is a picture of my chicken with the sauce and the veggies I served with it.
 
 
Enjoy &
Happy Cooking!


Wednesday, August 29, 2012

Guacamole


I love avocados. THEY ARE SO GOOD. With my love of avocados, comes a love a guacamole, so I thought I'd share a quick recipe. This recipe is single serving, but if you want to feed a crowd, just double, triple, etc. the recipe.

Ingredients:
1 avocado
1/4-1/2 tsp. garlic powder (depending upon how much you like garlic)
salt & pepper to taste
Optional: small roma tomato, diced
Optional: 1/8 cup onions, diced

Tip: Most avocados you buy in the store aren't ready to eat yet. Generally, the darker in color an avocado is, the closer it is to being ready. Also, a ripe avocado should have some squish! What I mean is, you should be able to apply some very light pressure to the avocado and feel it squish in (think dent). If your avocados aren't ready, your guacamole will be AWFUL so make sure you get a good avocado. Here is a picture of the inside of the little beauty I used, it was perfectly ripe. Also note the outside, its almost black.


To start off, cut your avocado in half and remove it from the skin. It should easily come out of the skin if it's ripe enough. Next place your halfs on a plate and smash them up with a fork. This part will be difficult if your avocado isn't ripe enough. It should go something like this:

Once you have your avocado smashed, it should look like this:


Next, sprinkle your garlic salt on top. I also usually sprinkle some salt and pepper on, but be careful, it's really easy to oversalt your guacamole. At this point you can also add in the tomatos and onions if you choose. I think those two ingredients take this recipe to the next level but it's still good without it. I did't put any in this batch because the official taste tester likes his guacamole plain, but I personally prefer it with the additional veggies.

Once you have everything mixed together, that's it! Take your favorite bag of chips and chow down! Here is a picture of the final product:


Enjoy
& Happy Cooking!

Tuesday, August 28, 2012

Turtle Brownies


I had a special request from a very special friend of mine for a post on some turtle brownies. We used to make these all the time together as kids and she would just go crazy over them. Only difference is, back then we used a box and this recipe is from scratch. Wish you were here to try them Angela!

For those of you that are wondering, the only difference between a turtle brownie and a regular brownie is that a turtle brownie has caramel and some type of nut added in. If you like the original, just omit the caramel and nuts from this recipe and you will be golden.

Ingredients:
1 cup sugar
1/2 cup flour
1/3 cup unsweetened cocoa
1/4 tsp. salt
1/4 tsp. baking powder
2 eggs
1/2 cup vegetable oil
1 tsp. vanilla
1/4-1/2 cup of your favorite nuts (I used walnuts)
caramel

To start off, pre-heat your oven to 350°. Mix your sugar, flour, cocoa, salt, and baking powder together in a medium sized mixing bowl. Add in your eggs, vegetable oil, and vanilla and mix with a spoon until just incorporated. It's really easy to ruin brownies by over mixing them so be careful here. Stir in your nuts and pour into a baking dish sprayed with non-stick cooking spray.

You can chose the size of baking dish you want to use based on how thick you want your brownies. I always use a medium sized dish and my brownies come out at about an inch thick. If you want really thin brownies, use a 13x9, BUT don't go any larger than this unless you double your batch. Also, if you use a larger baking dish you will need to reduce the cooking time. Likewise, if you use a smaller baking dish, you will need to increase the cooking time.

Once your brownies are in the pan, get your caramel ready. I usually just use squeezable caramel because it is so much easier and faster BUT if you want to truly make yours from scratch you can buy caramel pieces and heat them on the stove. If you do this, I would strongly recommend using a double boiler because caramel is REALLY easy to burn.

Once you have your caramel ready, pour in onto your brownie in a zigzag pattern (you can use as much or as little caramel as your heart desires). The goal is to spread it around the pan without completely drenching your brownies in caramel. Next, take a knife and run it through your caramel pattern (this helps push some of the caramel down into the brownie). Bake your brownie for 30-35 minutes (if you are using a medium sized baking dish). Your brownie will be done when you insert a toothpick into the middle and it comes out relatively clean. It's hard to see the caramel in the final picture but trust me, it's there in all it's gooey goodness. :)

 
Enjoy &
Happy Cooking!
Monday, August 27, 2012

Sausage Balls


Happy Monday Morning Everyone! I hope you all had an excellent weekend. I thought to start the week off we could do a recipe for some good ole' sausage balls. These can be made as breakfast or as an appetizer at a party. They are also excellent re-heated the next day. This is a great recipe to keep in your recipe box, it makes about 30 sausage balls. :)

Ingredients:
1 pound ground breakfast sausage, uncooked
2 cups Bisquick
2 cups shredded cheese (I usually use cheddar or colby jack, but you can use whatever you want)
optional: 8 oz. cream cheese, room temperature

Tip: The cream cheese is optional but definitely makes your sausage balls smoother and more moist. I would definitely recommend it! If you need to get your cream cheese to room temperature in a hurry, just heat it in the microwave for about 15-30 seconds.

To start off, pre-heat your oven to 350°. Combine your cream cheese and Bisquick in a mixing bowl (your mixture will be lumpy and dry). Next, add in your cheese and mix thoroughly. Finally fold in your sausage. The best way I have found to do this is to mix everything with my hands until everything is incorporated. It's a little messy but it works. Here is what your mixture should look like:

 
Next, drop your mixture into rounded balls onto a baking sheet. I just grabbed it with my hands and eye-balled it since they were already messy BUT this can also be done with a spoon. Here is what your sausage balls will look like before they go into the oven:
 
 
Bake your sausage balls for 20-25 minutes. You will know they are done when the tops are slightly browned. Here is your final product:


ENJOY!!!
 
 
Friday, August 24, 2012

Crockpot Chicken Tortilla Soup


WOOO HOOOO, It's Friday! I thought I'd give you a great crock pot meal to try this weekend. This is one of the simplest recipes I have ever seen and tastes awesome. You can see the original recipe here.
 
Ingredients:

2 Boneless, Skinless Chicken Breasts, can still be frozen (I used the 2 biggest breasts in the bag)
2 cans Ro-Tel
1 can Black Beans, drained
1 can Kidney Beans, drained
1 can of corn
1 onion, diced
4 cups chicken broth (or 2 cans)
1 cup water
1 Tbsp. Garlic Powder
1 Tbsp. Dried Cilantro
1 Tbsp. Chile Powder
1 Tbsp. Cumin
Tortilla Chips
Shredded Cheese (I like to use Fiesta blend but it really doesn't matter)
Sour Cream

Tip: Instead of buying tons of chicken broth cans, you can buy bullion cubes. They are cheaper, take up a lot less space in your pantry, and are just as good! To make chicken broth out of a bullion cube, boil 1 cup of water per cube. Once the water is boiling, add bullion cube and stir until incorporated. If you are making 4 cups of broth, you can boil all 4 cups of water at one time.

Tip: Instead of spices you can use a packet of taco seasoning. I like to use the original spices, but a taco packet would get the job done.

Tip: You will need a large crock pot for this recipe. If you only have a medium sized crock pot, half the recipe.

To start off, add your Ro-Tel, black beans, kidney beans, corn, onion, chicken broth, water, garlic powder, cilantro, chile powder, and cumin into your crock pot and stir until incorporated. Next, place your two chicken breasts on top of the mixture. The chicken breasts should sink slightly but still be mostly on top. As long as they as somewhat submerged you should be fine. Here is what mine looked like:

 
Next, set your crock pot to cook on low for 8 hours. Before serving your soup, take your chicken breasts out and shred them. This can be done by pulling the breast apart between two forks. I like to do this step with about 1 hour left to cook so the shredded chicken has time to soak up some spices and flavor, but this is just a personal preference.

Once your soup is ready, crumble some chips into the bottom of your bowl, ladle in some soup, and then top with your cheese and a dollop of sour cream. The official taste tester doesn't like sour cream, so he omitted that part (blasphemous, I know). Here is what your finished product looks like:

 
Next step, chow down and go to town! I hope you enjoy your weekend and happy cooking!
Thursday, August 23, 2012

Breakfast Ring


In looking at my blog, I realized that it was sorely lacking anything breakfast related. I LOVE BREAKFAST really at anytime of the day, so this was sad to me. When I stumbled upon this recipe, I knew I had to try it. You can see the original post here.

I used bacon in my breakfast ring but you can substitute any meat you would like. You can also add in whatever vegetables you would like. If you do decide to add more ingredients, reduce the number of eggs you use by 1-2. You don't want your ring to overflow!

Ingredients:
1 can of crescent rolls
5 eggs
1 cup of your favorite shredded cheese (divided in half)
8 slices of bacon

To start off, preheat your oven to 375°. Next step is to prepare your eggs and bacon. The eggs should be scrambled which can be done by beating them and then cooking them in a pan you have sprayed with non-stick cooking spray. The bacon can be done a couple ways. You can buy pre-cooked bacon, you can cook your bacon in the microwave (time depends on thickness and number of pieces), or you can cook it on the stove top. I always use the stove top because I find the other methods mediocre at best. Once your bacon is cooked, crumble it into pieces. This can be done by hand or in a food chopper. Once your bacon and eggs are prepared, set them aside.

Take you baking sheet and place a piece of foil or parchment paper on top. Then, place your crescent rolls into the shape of a star (points facing out). It took me a couple times to get this right, so don't worry if you have to move them around a little. You want them to overlap and leave a circle in the middle just big enough for all the points to touch. Here is what mine looked like:


Now, take half of your cheese and sprinkle it on the ring. It should look something like this:


Next, do the same thing with your bacon pieces, eggs, and the remaining cheese. Finally, fold the edges of your crescent rolls into the center and push them down into the circle in the middle. Once you have all the points in the center, push them down to seal them together. Your ring should look like this before it goes into the oven:

 
Bake for 15-17 minutes, or until the top is golden brown. Here is the finished product:
 
 
After the official taste tester tried this, he said I was the "cooking master" so I would say it was a success.
 
Happy Cooking!!


Wednesday, August 22, 2012

Deviled Eggs

Confession: I don't really like eggs all that much, especially not deviled eggs. Something about cold egg just grosses me out. Why am I posting this you may ask? This recipe ACTUALLY makes it good. Seriously, there are only 3 ingredients and these deviled eggs are awesome! These are great to make for a work luncheon or a party you have. We even make them sometimes just to eat at home!

Ingredients:
10 eggs (makes 20 deviled eggs)
1/4 cup mayo or miracle whip
1/4 cup Horseradish
Optional Topping: Paprika or Bacon Bits

To start off, place you eggs in a medium pot (just big enough for the eggs to sit comfortably in and still not sit on top of each other). Fill the pot up with enough water to cover the eggs by about an inch and bring them to a boil on medium-high heat. Boil your eggs for five minutes and then turn your burner off. Leave your eggs sitting on the burner that is off but still hot for about 20 minutes. This will allow the inside of your eggs to continue to cook for a little while longer.

Once your eggs have cooked, it's time to peel them. This part can be a little tricky so don't be discouraged if your first couple eggs look like someone took a knife to them (you'll get better!). After quite a few messed up eggs, the best way I found was to crack the egg at the top and start the peel from there (see picture below).When I tried to crack the egg in the middle and peel from there, the peel kept pulling off the actual egg, definitely not what you want.


Once you have all your eggs peeled, cut them in half and separate the yellow part from the white part. Here is what this should look like:


Notice how some of my white pieces are cracked and jagged. If this happens to you, don't worry about it, you can cover that up with the filling we are about to make.

Take the plate of your yellow parts and crush them up finely with a fork. Try to get them as fine as possible here. Next, dump you crushed yellow pieces, your mayo, and your horseradish into a bowl and stir together. This is about what it should look like:

 
Now, all you have to do is spoon your mixture into your white parts and you are done! You can put as much mixture in each white part as you want, just make sure you have enough for all of them. I usually fill them just enough to fill the hole and then go back and add any extra that I have left over. Once you fill your eggs, you can sprinkle paprika or bacon bits on top if you desire. I like the paprika ones the best but the official taste tester likes the bacon ones the best. Here is a picture of your finished product:


Happy Cooking!!!


Tuesday, August 21, 2012

AMAZING Burgers

Just like the title says, these burgers are A-M-A-Z-I-N-G! As yall know, I like to cook quite a few different things, so when the official taste tester asks to have something as simple as a hamburger 2 days in a row, there has to be something special about them.

Something to note. We are ground turkey users in the Walker house. We pretty much never buy beef for any reason because turkey is healthier and lighter (don't believe me? TRY IT!). I used turkey to make these burgers but ground beef could be used just as easily.

This recipe was adapted from here. She also has a special sauce that she puts on her burgers that I would definitely recommend. I will add it(with 1 small revision at the bottom of this post).

Ingredients:
1 lb ground turkey (or beef) - 85/15 (this ratio is important!)
1/4 cup grated or shredded cheese (this can be any kind so use your favorite!)
1/4 cup BBQ sauce
1/2 tsp. season salt
1/4 tsp. black pepper
1/2 tsp. minced onion.
Optional (as needed): breadcrumbs

The ratio of the meat(how lean it is) is important because the extra fat content in the meat will help hold your burger together. If you use a really lean meat, you burger will crumble into pieces when you try to cook it because of all the extra ingredients.

Combine all your ingredients into a bowl and mix together well. The best way I find to do this is to mix everything together with your hands. If you meat mixture is too "wet" to mold into patties, you can add some bread crumbs in to thicken it up a bit. This can't really hurt your burgers so when in doubt, add some in.

Mold your burgers into patties that are about an inch thick (these burgers are going to be big!) My mixture made 4 burgers (If you need more, just double or triple the recipe). Here is a picture of my quarter pounders before cooking:


They look pretty fantastic huh?  I would not recommend cooking these on a grill as it may contribute to your burgers falling apart. I have a stove-top griddle that I always use, but a regular pan would work just as well. Spray your pan with non-stick cooking spray and then place your patties on the pan. Cook for about 4-6 minutes on medium heat on each side. It's important to let the first side you cook get nice and brown so your burger will be set. If you flip your burgers to soon, they might crumble apart (see a pattern here?!).

The ability to crumble so easily is due to the burgers being so moist, trust me, this is a good thing!

Here is a picture of the finished product:


I promise, you will not be disappointed with these babies. As you can see, I added a little guacamole, tomatoes, and onions to mine. This made them even better! The special sauce is on there too, you just can't see it.

Here is a recipe for the special sauce. This is almost exactly the same as the original recipe with the exception of the addition of one ingredient for a little zing! This is supposedly like the sauce from In-and-Out burger, but I have never been there so I wouldn't know. Either way, it's good!

Ingredients:
3/4 cup Mayo or Miracle whip
1/4 cup Horseradish
1/4 cup Ketchup
1/4 cup Relish
2 Tbsp. Worcestershire Sauce
1/2 tsp. Season Salt

Combine all ingredients until mixed well. You can adjust the amounts if needed to your tasting preference.
Monday, August 20, 2012

Coronarita

After a hard Monday's work you may need a drink at 5 to take the edge off. :) In the Walker house, we are Margarita junkies. We just can't help it, that's our drink of choice. When I stumbled upon this little recipe on Pinterest I knew I was in trouble. You can read the original post here. The first time I made this I followed the recipe exactly and it was OKAY. I tweaked a few things and it was AWESOME. :) Be careful, these are dangerous!

Ingredients:
1 can Frozen limeade concentrate
Tequila (use limeade can to measure)
Sprite
Water
Coronas (I usually use the smaller Corona bottles but if you use a bigger glass you can use the bigger Corona)
Optional: Margarita Salt

In a drink pitcher, add the can of frozen limeade concentrate. Then take your limeade can, fill it up with tequila and add it to the pitcher. Do the same thing with Sprite. Next, take the can and fill it half way with water and add that to the pitcher. Mix everything together until the limeade is thoroughly dissolved.

Take your cup and salt the ring with margarita salt. The way I have found that works best for this is to dip the rim of the cup into the margarita mixture and then into the salt.

Once your cup is salted, fill your cup 1/2-3/4 full of margarita mix. Then open your corona and quickly invert the bottle into your cup of margarita mix. This may take some practice... the first time I did it I had added to much margarita mix and my cup over flowed slightly. Each batch makes about 4 coronaritas.

Next, ENJOY! Like I said, these are dangerous so be careful. Here is a picture of the finished product:

CONTEST TIME!!

THIS CONTEST IS CLOSED!

Thank you to everyone who has been following the blog! :) It really makes me happy. I think to spread our fan base a little more, it's time for a contest. LET'S GET EXCITED!!!

The prize for the contest will be: A Cooking Gift Basket with a ton of goodies :)

There are 2 steps to enter the contest:
1. Sign up to be a follower of the blog. You do this by clicking "Join this site" on the main home page (see picture below). You can also follow us on Facebook!

2. Refer people to the blog. Have your friends leave a comment on any post with the name of the person that referred them OR you can share our Facebook page and have people leave a comment on our wall.

The person with the most referrals wins!
Friday, August 17, 2012

Mellark Peanut Butter Fudge

Day 5 of our week long Hunger Games series :) T minus 1 day until the release of the first Hunger Games DVD!

Who is going to get the DVD at midnight?! ME!!

Click here to see Day 1.
Click here & here to see Day 2.
Click here to see Day 3.
Click here to see Day 4.

This recipe is pretty awesome. I have never made fudge before so I was nervous, but this recipe can be made by anyone, especially when channeling the Mellark bakery :). It's probably the easiest dessert with the fewest ingredients that I have ever seen. It takes about 10 min to make and has been described as "peanutbutterlicious" by the official taste tester.

Ingredients:
2 cups sugar
1/2 cup milk
1 tsp. Vanilla
3/4 cup Peanut Butter

Stir your milk and sugar together in a pan and place on the stove. The mixture should be a white-ish color (see picture below)

Next, set your stove temperature at the lowest temp possible that is still hot enough to boil the sugar mixture. My stove goes up to "9" and I put it on "4". This step is REALLY important because it's really easy for sugar to burn. Cooking it to fast will be detrimental to your fudge.

While your sugar mixture is in the early stages of heating (or before you start), mix your peanut butter and vanilla together in a separate bowl and set aside. It's important to have this prepared before your sugar mixture starts boiling because once that happens you won't have time to mix it up.

Stir your sugar mixture frequently while it is heating up. Once it starts boiling, it should look like this:

Let the mixture boil for 2 1/2 minutes and then remove from heat. The longer it boils, the clearer the mixture will get. Once you remove the sugar mixture from the heat, immediately add the peanut butter and vanilla mixture and stir until fully integrated. Next place you fudge into the pan you want to keep it in. The fudge will set pretty quickly so do this as fast as possible. The key to this recipe is TIMING!

Let the fudge cool before cutting it up or it will break into pieces. Here is what the finished product looks like:


Now that's something Peeta would be proud of. I'd say he would even burn a little so he could give it to Katniss :)

Happy cooking & may the odds be ever in your favor!

Thursday, August 16, 2012

Capital-Grade Chocolate Cake

Day 4 of our week long Hunger Games series :) T minus 2 days & counting until the release of the first Hunger Games DVD!

Click here to see Day 1.
Click here & here to see Day 2.
Click here to see Day 3.
Click here to see Day 5.

This recipe was taken and adapted from the Unofficial Hunger Games Cookbook. :) It really is probably the easiest "from scratch" cake you could ever make... Maybe that is because the people at the Capital are always pressed for time. Either way, it's definitely capital-worthy!

For those of you who are big-time fans, you will know that chocolate cake is what Katniss had her first night away from her family after the reaping. I hope you enjoy it's decadence as much as she did!

Ingredients:

Cake:
2 cups all-purpose flour
2 cups sugar
1 cup unsweetened cocoa powder
2 tsp. baking soda
1 tsp. baking powder
1/2 tsp. salt
2 eggs
1 cup cold brewed coffee
1 cup buttermilk
1/2 cup vegetable oil

Icing:
1 stick of butter (softened)
2 1/4 cups powdered sugar (confectioner's)
1/2 cup unsweetened cocoa powder
1/4 tsp. vanilla
1/4-1/2 cup milk

Preheat your oven to 350° and spray a 9x13 pan with non-stick cooking spray. In a large bowl, mix together your flour, sugar, cocoa powder, baking soda, baking powder, and salt until incorporated. Make a well in the middle of your dry ingredients (basically just make a hole in the middle) and pour your eggs, coffee, buttermilk, and oil into it. Mix your ingredients together with a spoon until smooth and then pour into your pan. Bake for 35-40 minutes or until a toothpick inserted into the middle of the cake comes out clean. Here is a picture of what mine looked like when finished:


Don't worry if the middle sinks down a little, you can cover that up with frosting. :) Wait until your cake has cooled completely to frost it or your cake will crumble AND your icing will melt!

To make the icing, place your butter in a medium sized mixing bowl. If you need to soften your butter in a hurry, you can heat it in the microwave for 15 seconds. With a hand mixer, beat your butter on medium speed until creamy. If you are not sure what creamy butter looks like, take a look at my picture:


Next, reduce your mixing speed to low and add in the powdered sugar, cocoa and vanilla. Your frosting should be somewhat crumbly at this point. Finally, add in your milk slowly until your frosting is at the consistency and thickness that you want. Using 1/4 cup of milk will make your frosting thick like paste and 1/2 cup will make it fairly thin. I used 1/2 cup but you can make your frosting however you would like. Here is a picture of the finished product:


See? I told you that was easy!

Tip: If you want, you can make your cake in two 8 inch round pans and then stack them. If you do this, you will need to double or triple your frosting mixture.


Happy cooking & may the odds be ever in your favor!