Tuesday, January 29, 2013

DIY Chevron Home Decor (Initial)


I LOVE CHEVRON!! Seriously, it's one of my favorite new patterns. Who is with me? Now I know it's Superbowl weekend and I should be giving you a ton of new recipes for your parties BUT I have been on this home decor kick lately and I just had to share. For tips on recipes to use for your Superbowl parties, check out our Recipes tab.

For anyone who has ever tried chevron, you know it can be difficult. Most people tell you to make grids and all this other kind of stuff. Who has the time or patience for that?! I definitely DO NOT. The good news is, the way I am teaching you is very simple and doesn't take very long. Hooray!

Just so you know, I did have a few hiccups along the way with this project. Good news is, I know exactly how to prevent those problems for next time, SO I assure you, you don't have to worry about them! :)

Supplies:
-Wooden Letter of your choosing (Mine was $13 from Hobby Lobby)***
-2 Spray paint colors of your choosing (I used green and white)
-Painter's Tape (I used 1 inch wide)
-An X-ACTO knife (or scissors if you don't have one)
Optional:
-High Gloss for finishing

***Tip: I am obsessed with my "new" last name so I love to put W's all over our house BUT this pattern can be done with anything that tape and paint will stick to, it doesn't have to be a wooden initial!

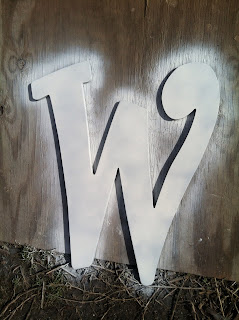
To start off, spray paint your letter (or whatever you are using) in the base coat. I used white as my base coat because I figured green would paint over white better than vice versa. I definitely recommend using your lighter color as the base.


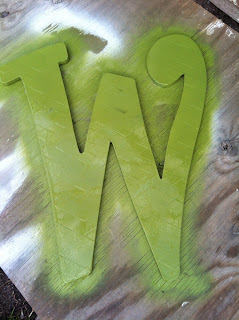
TIP: I HIGHLY recommend using quality spray paint. For my base coat, I used the 96 cent spray paint from walmart and it peeled very badly. The quality spray paint is about $4 a can, but will not peel at all. I used the good paint for the green and it turned out WAY better. You'll see what I mean in the pictures below.

TIP: I painted my letter outside and had to pick some bugs off my paint that flew into it. Try to paint somewhere that doesn't have a bunch of critters!

Ok, back to the tutorial.

Next, let your base coat dry! I only let mine dry for about an hour which was not long enough... I couldn't help it, I just got  excited! If you don't let the paint dry, it will peel (see pictures below). If you can, let your letter dry over night!

Next, use your painter's tape to make diagonal lines across your letter. Space the tape lines about 1 inch apart, or the width of one piece of tape. You can measure this if you want to but I just eyeballed it and it turned out fine. When the tape went across lines on the letter, I just used one long piece of tape and then cut the tape out of the empty space.


Once you have finished the diagonal lines one way, do the same thing with diagonal lines the opposite way.


I think this looks pretty cool too, but right now we are going for a chevron look!

Now take an X-ACTO knife (or scissors if you don't have one) and cut out the pieces of tape that don't form the chevron pattern.


As you can see, this is where I encountered my peeling. Like I said earlier, use better quality spray paint and let your letter dry longer and this won't happen!

Now, go over your tape to make sure it's pressed down well and then spray your letter with your other color.

 
Finally, wait for your paint to dry, and peel off the tape! For those of you that didn't use cheap paint AND let your letter dry, this should be all you need to do.
 

As you can see, I had a little trouble with my white paint. The chevron pattern looks amazing, but I had to do something about those pesky little black spots.

To fix them, I just used some white acrylic paint I had and covered them up with a few coats. It worked very well! Here is a picture a few coats in, as you can see, we are almost there:

 
AND after a few more coats:
 

B-E-A-UTIFUL! Also, 10 points extra credit to anyone who got that movie reference.

Here are a few more pictures of my finished Chevron Letter. :) I am so in love with it!!


Happy Crafting
& Enjoy!!!
 
ALSO, special shout out to my mother in law, Vickie Walker, who is our newest follower!
Thursday, January 24, 2013

Chocolate Banana Smoothie


Good Thursday Morning! Today I want to show you a little breakfast drink that I discovered on Pinterest the other day. Since I saw the drink, the official taste tester & I have been having it for breakfast every morning!

Four things:
1. I normally don't eat breakfast. I would rather sleep and/or cuddle with my dogs for longer than eat breakfast. Yes, this makes the last 1-2 hours before lunch time fairly brutal, but I usually manage. This recipe changes all that. I still want to stay in bed, but considering it takes about 1 minute to make, I can have both.
2. I LOVE SWEETS. Seriously, I'm addicted. SO, anything that is sweet-ish in the morning, I'm totally in.
3. The official taste tester & I have been growing horizontally since our wedding. It's unfortunate, but true. This recipe is healthy which is great for our endeavor to start shrinking our waist lines!
4. I don't like smoothies. It's not really the taste... it's just that I would rather have a chicken sandwich than a drink that has the same amount of calories and won't fill you up.... seriously, the smoothies at Smoothie King are like 600-700 calories. Good thing about this recipe is, it DOES fill you up and it's not bad on calories. :)

Have I convinced you to try it yet?! I sure hope so! The total calories of this smoothie is 335. Not bad for a well-balanced meal! Yes, it is well-balanced... it has fruit (bananas are a great source of antioxidants and potassium), calcium, protein, and vitamins!

Ingredients:
-1 Banana
-1 Tbsp. Peanut Butter
-1 cup Ice (we have regular ice trays and I ended up using 12 ice cubes)
-1 cup chocolate milk (I use 1%)**

To make your smoothie, simply add all your ingredients in a blender and mix them all together until your ice is chopped. The smoothie makes about 20 oz. which is awesome (could probably even be enough for two)! I have been taking them to work with me and drinking it while I check my emails. It's a great start to my day, and keeps me full until lunch!


**The official taste tester wanted me to alter his smoothie slightly. He has started using this:
The smoothie tastes about the same, but it does increase the calories by about 100 (comes out to 415). The benefit of this is you get A TON more protein, calcium, and vitamins. Considering I'm not trying to be a body builder, I don't really need the extra protein or calories so I opted to not use this. If you do use this, use a cup of regular milk instead of chocolate milk. Also, you could omit the peanut butter to save the extra calories, but this also reduces your protein.
 
Happy Smoothie Making
& Enjoy!
 
P.s. Follow us on Facebook here!
Thursday, January 17, 2013

Date Night In Idea


Marriage is hard...sometimes. All those marriage blogs out there that tell you it's all peaches and roses all the time are full of CRAP because sometimes marriage is just hard. Don't get me wrong, I love my hubby with everything that I am but I also plot his death in my mind on occasion (TOTALLY kidding!!) :). We have only been married for a year, but we have had a few fights, so I feel like I have at least a little bit of wisdom to offer. It's true that sometimes, I want to lite him on fire on the way to work in the mornings, but always by the end of the day, I am still totally loving and missing him. Sometimes marriage is weird that way :)

Wednesday morning was particularly nasty for us,  so by the end of the day I decided we both needed a little something so we could feel the love. Not to mention it was the first day of school for both of us. We had such a great time that we are going to start doing date nights in at least once a week.

Great thing about a date night in is that you get to have a lot of fun, all while not spending very much money. Plus, it's been pretty cold and rainy lately so who wants to get out in that?!

For our date night, we had some pizza and did a craft together. When I told my hubby we were doing a "craft" he just chuckled at me, but he ended up having a great time.

To prepare for this date night you need:
-Mugs
-Colored Sharpie Pens

Optional:
-Cheap Pizza for dinner
-Your favorite beverage (we had Coke and Water lol)
-Quilt to sit on

I wanted to make this date as fun as possible for as little as possible SO I stopped by Dollar General to pick up the mugs for our craft. If you can, get white mugs so the colors show up better. They didn't have any white mugs, so I got the next best thing: GREEN! Green was one of our wedding colors so we are kind of partial to it, but you can pick whatever color you want. The mugs were $1.50 each.... so far the date was costing me a little over $3. I already had sharpies so I didn't need to get any of those.

Next I stopped by Dominoes. On Wednesday nights they have medium pizzas for $3.99 which is the perfect size for the two of us to stuff our faces. I'm not sure if this is franchise wide or only in our town, but there are plenty of places that have cheap pizza. Little Caesars always has pizza for $5 and the grocery store has frozen pizza for anywhere from $1-$7. Anyways, grand total of the date so far: about $7. That's a steal!

I realize this post is getting long and I need to get to the point! Just bare with me.

OK, so I layed out a quilt in the middle of our living room and set up the pizza and drinks for us to eat picnic style. We ate the pizza strait out of the box... can you say AWESOME?! We also watched Grey's Anatomy(obviously, my choice) and talked about our days while eating.


Once we were done with that, I went and grabbed the mugs and sharpies and we got started. We decided to make mugs for each other to take to work. It was pretty awesome coming up with stuff to draw on them. Daniel loves Star Wars (DORK MOMENT) so I drew a Yoda on one side and our family on the other. He decided to draw various things from our first year of marriage on mine. The pictures say it all.... The cat and dog even got in on the action.


(she really doesn't look this demonic all the time)


Once your mugs are done, trade them and laugh at all the drawing you made... we certainly did. Ladies, if your husband thinks you are "better at making mugs" like mine did, you may have to inspire his confidence a little. This is his "I suck at drawing and yours is better than mine" face:


Finally, pre-heat your oven to 425 and bake your mugs for 30 minutes to set the drawings. Leave them in the oven until completely cooled. After baking they should be safe to wash.

(Sorry the picture isn't good, the glare was out of control!)
While we baked our mugs we watched some TV and just spent time together.

(please ignore the dog toys and cat carriers in the background)

This is probably one of the most fun dates we have ever had and it was way cheap. I HIGHLY recommend it. :)

And ladies, don't set your husbands on fire.... it's illegal. ;)
Tuesday, January 15, 2013

Zebra Cake

Hey Everyone! How are you all doing today?

For Christmas I asked for cake decorating supplies. This is something I have been wanting to try for awhile, and finally after getting some awesome goodies for Christmas, I was able to try. My niece was coming into town to visit for the weekend, so I decided to try out my new toys by making her a cake! It turned out pretty cute and I can't wait to try it out again.

I saw this zebra cake idea a long time ago on Pinterest and honestly have no idea where it came from, so I don't know who to give credit to. Whoever came up with this, awesome idea!

Ingredients:
-1Box white cake mix
-Black food coloring
-Ingredients from back of cake box (usually eggs, water, & oil)
-Optional: Parchment Paper

Decorating Ingredients:
-Fondant (you can buy pre-made fondant in the cake decorating section of Walmart)
-Buttercream Icing (recipe toward the bottom of the page)

TIP: If you don't want to waste your time with the black food coloring OR you want a bigger cake, use chocolate cake mix for the black stripes in the cake.

Making a Zebra Cake is actually fairly easy. It doesn't take any longer than making a regular cake and it looks pretty awesome.

To start off, preheat your oven and mix your cake mix and ingredients together as directed on box. Next, separate your cake mix into two separate bowls and add black food coloring to one of them. Use as much food coloring as you need to make it as dark as you want.


Next, set your mix aside, and grease your cake pans. I used two 9 inch round pans, and lined the bottom with parchment paper to prevent sticking. I also sprayed both pans with non-stick cooking spray. I find this method works WAY better than the Crisco/flour method.

Next, drop about 1/4-1/2 cup of batter onto the center of each pan. It doesn't matter which color you start with, but I started with black.


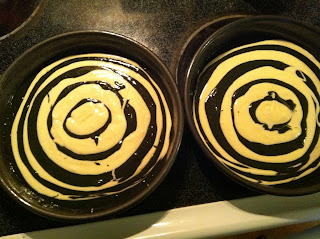
Next, add the same amount of white cake mix into the center of the black. Repeat this process over and over until you use all your cake mix and have a nice bullseye.


Your cake mix should spread out on its own but it may need some help from you. After every couple rounds I would tap the cake on the counter and shake it back and forth some to spread the cake out more. You want to try and have your layers over lap as little as possible! Here are my finished pans before going into the oven.


And then after coming out of the oven (Bake according to cake mix directions). You will be able to see the zebra stripes when you cut the cake for serving.


Let your cake cool completely before decorating. Once cooled, you can decorate your cake however your heart desires!

I used buttercream icing and then covered the cake with fondant. To do this, level the top of your cake layers until flat. You do this by cutting off small layers from the top until the cake is level. Here is what mine looked like leveled:


Next, frost your cake by putting icing between the layers and around the whole cake. It doesn't matter is you get crumbs in the icing because the cake will be covered in fondant.


Next, roll out your fondant (about 1/4 inch) and cover your cake in it. Cut off any excess fondant around the edges.


Doesn't that look great already? I wanted to go one step further so I added some fondant to look like ribbon and a bow. As you can see in the picture, I cut the bottom of my fondant a little short, so I added some fondant balls around the bottom to cover it up. I made these by rolling the extra fondant scraps into small balls and sticking them around the edges with some extra buttercream.


Isn't that cute? My dog REALLY wanted some cake at this point, but we had to save it for my niece.


Here is a picture of the cake once we cut into it:


Do you see those beautiful zebra stripes? Pretty cool huh? You can also make this cake into any color Zebra you want. I have made a pink and purple striped cake before.

Here is my niece enjoying the cake, I think it's safe to say it was good. :)


Happy Cooking
& Enjoy!


Thursday, January 10, 2013

Crockpot Chicken for Burritos or Tacos


Hey everyone! I have missed you so far this year! :) I had a request to have more crock pot recipes on the blog, so I thought I'd start out with one today. This recipe is easy and makes for a great Mexican food night (Mexican food is pretty much our favorite.... we have it all the time)!

Ingredients:
2 cups Picante Sauce (16 oz. jar)
1 packet taco seasoning
4-5 frozen chicken breasts

TIP: You can make your own taco seasoning by combining 1 Tablespoon of each of the following ingredients: Cumin, Chili Powder, Garlic Powder, and Onion Powder. Optional: Add in 1/4 Teaspoon Crushed Red Pepper to give it some spice.

To make this recipe, throw all the ingredients into the crock pot and mix it together to coat the chicken. Then set your crock pot to low and let the chicken cook 6-8 hours.


Once the chicken is done, shred it between two forks and mix everything together to evenly coat the chicken shreds and you are ready to go!

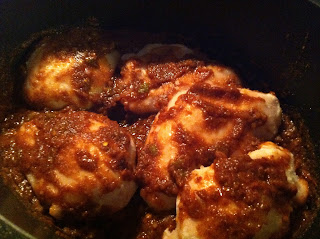
Chicken before shredding:

Shredded Chicken


We used ours to make Burritos and Tacos but it can be used for anything from Enchiladas to Taco Salad. It's a really versatile dish and very easy to make.

TIP: Once you assemble your burrito, "grill" it in a panini grill for a few minutes, it makes your tortilla crispy! :)

Here is a picture of my burrito, very yummy!!!


Happy Cooking
& Enjoy!