Thursday, August 9, 2012

Baked Ziti

I have a very special reader that is a vegetarian :) I noticed that so far my blog has not been very vegetarian friendly SO I decided to post this. It still tastes really good for all those who do not embrace the veggie lifestyle, so don't turn away just yet. This dish is also a staple in our kitchen because I frequently forget to lay out the meat for dinner in the mornings. There is nothing worse then getting home from a long days work and everything you need to cook dinner is frozen solid. This recipe solves that problem, is easy to make, and is excellent leftover the next day (or few days!).

Ingredients:
16 oz. Pasta (technically you are supposed to use ziti noodles but who really cares?)
45 oz. Pasta/Spaghetti sauce (any flavor you want)
2-2/12 cups Mozzarella cheese
optional: Parmesan cheese

To start off, boil your pasta according to package directions. Once that is done, drain the water off the pasta and stir in the pasta sauce. In a future post, I will show you how to make your pasta sauce from scratch but for times sake, we will use store bought. Grab a 13x9 pan and spray it with non-stick cooking spray. Now comes the tricky part (I hope you caught my sarcasm)! Make layers of your pasta mixture and cheese. This isn't an exact science and there is really no right way to do this. In fact, it's literally impossible to mess this part up. Use as much or as little cheese as you want. Also, if you are deciding to add in the Parmesan cheese, you can add that into your layers as well. Once you have used all your pasta, make your top layer cheese.

Here is a picture of what it looks like before you stick it in the oven:


Bake at 350° for 20 minutes. This dish goes nicely with a side salad and garlic bread.

Here is the finished product:


The "official taste tester", as he calls himself, approves :)


Wednesday, August 8, 2012

Homemade Whipped Cream

Who loves whipped cream? This girl right here! Who does not enjoy pre-made and processed foods when making it from scratch takes about 2 minutes? ME ME ME! So if you can guess, I DO NOT like buying whipped cream. Its expensive, it's REALLY easy to make yourself, and the real thing tastes SO MUCH BETTER! I thought I'd share this recipe (if you could even call it that) because whipped cream can be used to decorate pretty much any dessert. Not only is it good, but it makes the dish look "pretty" and part of impressing is in the presentation.

Ingredients:
-1 cup whipping cream
-2-3 Tablespoons powdered sugar

Pour your cup of whipping cream into a bowl (make sure you use a bowl with some extra room because the whipping cream will double in size) and beat on medium speed until soft peaks form. What is a soft peak you may ask? This is when you insert the beater (when its off!) into the whipping cream and the cream forms a peak when you pull it out (normally, the cream would drip right off the beater). A soft peak will fall right back over into its side while a stiff peak will continue standing strait up. Save that stiff peak knowledge for later because you will need it! Once your whipping cream forms soft peaks, add your 2-3 tablespoons powdered sugar. I ALWAYS use 3 tablespoons because I like my whipped cream sweet but add powdered sugar to your liking. Finally, beat your cream on medium speed until stiff peaks form (remember that stiff peak knowledge!). This should happen relatively quickly.

Here is what your whipped cream will look like when it's finished:

Who could resist that fluffy goodness? I certainly couldn't. If you want to make it chocolate flavored, add a little cocoa powder. Same goes for any type of flavoring you can buy (vanilla, almond, etc.).

If you just want to put a little dollop on a piece of pie or some ice cream, stop here and go to town! I almost exclusively use whipped cream to decorate my cakes so keep reading to find out how to do that.

Grab a large cup and a gallon zip lock bag. Place the zip lock bag into the cup and then fold the edges over to create a pouch. Spoon your whipped cream into the bag. It should look something like this:

There is absolutely no reason to buy piping bags. They are robbery EXPENSIVE and you can get just as good of an effect with a zip lock bag. Cut the corner off of your ziplock and start decorating. The size of your cut will determine the size of your whipped cream decoration so be careful here. I don't have any type of fancy cake decorating skills, so I usually just cut a small hole and then do uneven circles around the outside edge of the cake(see picture below). Sometimes, if my design isn't really turning out, I just pipe the rest of the whipped cream onto my cake and then take a whisk and play with the whipped cream until it all looks uniform. You really can't mess this step up.

One thing to remember, whipped cream will melt if it gets hot. The heat from your hands is not the whipped cream's friend, so try to do the decorating as quickly as possible. Also, any cake that has whipped cream on it needs to be refrigerated.

Here is a picture of a cake decorated with the whipped cream:

SO EASY and this cake definitely looks store bought. Enjoy!

Tuesday, August 7, 2012

Cheesy Crock Pot Chicken Spaghetti


We all know I love cheese....seriously, its an addiction. I also love crock pot recipes because, lets face it, sometimes I get really lazy when it comes to cooking. SO, when I stumbled upon this little beauty on Pinterest I was delighted. You can read the original post here. I love getting on Pinterest, finding recipes and tweaking them to perfection, and that's exactly what I did with this little gem. This recipe takes about 15 minutes to prepare and then 2-3 hours to cook. It's also slightly spicy, but in my opinion, it was just enough to give it a little kick.

Ingredients:
-16 oz. Dry Spaghetti Noodles
-1 lb. Velveeta Cheese
-2 cups cooked chicken**
-1 can cream of mushroom soup
-1 can cream of chicken soup
-1 can Rotel
-4 oz. can mushrooms (stems & pieces, drained)
-1/2 cup water
-1 small onion diced
-pepper to taste

**I used chicken breasts and shredded them, but you can also cube the chicken. To make this recipe even faster you can buy pre-cooked canned chicken at the grocery store.

To start off, I sprayed my crock pot with non-stick cooking spray to prevent sticking. Then, I cut my Velveeta cheese into 1 inch cubes and threw them in the crock pot This doesn't have to be exact by any means! Next, I added the cream of mushroom soup, cream of chicken soup, and water. Stir this mixture and set the crock pot to low.

While the cheese mixture is starting to melt together, place your chicken breasts in a pan of water and boil for about ten minutes. In order to get 2 cups of cooked chicken, I used 4 chicken breasts (2 of which were tiny), but this also doesn't have to be exact. Use however much chicken your heart desires! This is also a good time to get your noodles cooking. Cook them according to package directions (generally this means to boil them for 8-10 minutes). While your chicken and noodles are cooking, cut up your onion and throw it in the crock pot. At this time you can also add your Rotel and mushrooms.
Once you chicken is done cooking, shred it by using two forks to pull the meat apart. If you are having a hard time shredding your chicken, it needs to boil longer. When it is done, the meat should easily come apart. I like to use shredded chicken because then there is meat in every bite. If you are pressed for time, you can cube the chicken. Once you have your chicken shredded (or cubed) toss it in the crock pot. Stir everything together and add some pepper. I put enough pepper in to cover the top and then stirred everything together. Next, drain your noodles and then stir them in. Let the crock pot cook for 2-3 hours on low and ENJOY!!! We got a little hungry and started eating after it had been cooking an hour and a half... we just couldn't wait :).

Here is a picture of your final product:


This recipe keeps excellently in the fridge and can be taken for lunch the next day or eaten as leftovers for a few nights.

Tip: To make this recipe healthy healthier, use whole wheat noodles, 2% Velveeta, and reduced fat or fat free cream of mushroom and cream of chicken soups.

Tip #2: To make this recipe REALLY spicy, use "hot" Rotel.
Monday, April 30, 2012

BBQ Sausage

Happy Monday everyone! To start the day off, I thought I'd share an easy little recipe with you. My cousin got this recipe from my grandma and then passed it on to me, so I thought I'd pass it on to you! I did edit the recipe slightly to decrease the time, but other than that, it is exactly the same.

Ingredients:
-1 pound Eckrich Skinless Smoked Sausage
***You can use any variety of this, this is just the one I have found to work the best

-1 1/2 cup BBQ sauce
***I usually use original but again, you can use any variety
-1 cup water

NOTE: You'll want to use a pan that is small enough to cover your sausage completely in liquid. If not, the sausage will be over-cooked! For an example of what I'm talking about, see the picture at the end of the post.

To start, preheat your oven to 325°. Take a oven safe pan that has an oven-safe lid* and pour in the BBQ sauce & water. Mix the BBQ sauce and water together and set aside. Cut up your sausage into bite sized pieces and place in your BBQ mixture. Next, Stir everything together until well coated and bake 35 minutes with the lid on. After this, remove the lid, and bake the sausage at 350° for an additional 15 minutes.
*If you are using a pan that doesn't have a lid, you can cover the top of the pan with foil and it should work exactly the same

That's it! This is pretty much the easiest entree you could ever make and it tastes good! Daniel and I have made this as our main dish, topping for baked potatoes, and as an appetizer at a party. The list of things you can do with this simple little meal is endless! See the finished product below and enjoy!

Thursday, April 26, 2012

Queso/Cheese Dip

Hey Everyone! Sorry it's been awhile since I posted, the life of a graduate student is pretty hectic at times. Trust me, I'd rather be posting here than studying but hey, what can you do?

First of all, I LOVE CHEESE. I love cheese so much, it is a major problem (and argument!) in our house if Daniel eats my last piece of cheese. :) It's a serious addiction. Anyways, we are having a pot-luck dinner at work and anytime I go to something like this my go-to dish is always my queso. It's a (very!) slight twist on the traditional Velveeta/rotel combination that keeps people coming back for more and more. I'm telling you, this stuff is addicting (and not just because I love cheese!).

I always make this in a crock pot because I can throw the ingredients in there and basically forget about it, but it can be made on the stove, microwave, etc. Basically, make it in whatever way is convenient/easiest for you.
**PLUS of using a crock pot: Make it ahead of time at home and then bring the whole crock pot to party, this keeps the queso constantly warm.

Ingredients:
-1 package Velveeta cheese ( I usually use the original but you can chose any kind you like: 2%, etc.)
-2 cans Rotel ( I use the original but you can use mild or hot to make it spicier)
-1 pound breakfast sausage
-1 can kidney beans (light or dark will both work)

**This recipe serves 10-15 people. It can be doubled to serve more. It also keeps really well in the fridge (for about a week).

To start out, plug in the crock pot and turn it on low (this will keep the cheese from burning). Then cut up the Velveeta cheese in 1 inch cubes. This doesn't have to be exact in any way, shape, or form! Just try to make sure your cubes are about the same size so the cheese melts evenly. Throw the cheese in the crock pot and let it melt for about 15-20 minutes. If you ended up with a bunch of different sized cubes, just try and stir your cheese more frequently. At the end of the 15-20 minutes, the cheese will still be pretty thick and may still have some cubes left but that's OK. It just needs to be mostly melted.
**If you are using the stove, melt your cheese on a lower setting and stir it frequently or it will burn!
**If using the microwave, heat cheese in microwave safe bowl for 1 minute intervals until the cheese is melted. As it gets closer to being melted, I would decrease this to 30 second intervals

Next, open your first can of Rotel and dump the entire can (juice & all) in the crock pot. With the 2nd can, drain the juice before putting in the Rotel. This will give your queso the right thickness (not to thick, but not so thin that it falls off the chip!). Stir the rotel into the cheese until incorporated and then leave it in the crock pot to continue to heat while you do the next step.
**If using a stove or microwave, continue to heat until the cheese is fully melted.

While you are letting your queso heat, grab a skillet or pan and cook your sausage on medium heat (my stove goes from 1-9 and I usually use 5 or 6). I always use a fork and knife while I' cooking my sausage and cute it up as it's cooking. This ensures that the sausage is in small pieces (remember, the goal here is to have some sausage in almost every bite!). Once the sausage is fully cooked, throw it in the crock pot with the cheese & Rotel. By this time, your cheese should be pretty much fully melted (or getting close!)

Once the cheese mixture is fully melted (basically, at the consistency you would want to eat it), open your can of kidney beans, drain off the liquid, and pour contents into the crock pot. If the queso is to thick for your preferences, you can add in some of the kidney bean juice to thin it a little. Stir everything together and let the mixture heat for another 5-10 minutes.

Finally, enjoy!!!! Below is what your finished product should look like. If the queso isn't going to be eaten in the next hour or so, I would turn the setting on the crock pot to warm (if your crock pot has it). This will ensure the cheese doesn't burn on the bottom. If not, just stir your queso more frequently (every 30-45 minutes or so).

Tuesday, March 6, 2012

Parmesan Ranch Chicken

Ok everybody, get ready to make the easiest, best chicken recipe you have ever had! I was experimenting one day and had a thought, simplicity is best (thats where this little beauty came in). Daniel starts salivating the minute I start cooking this up so get ready!

When I say this recipe is easy, I mean it. EA-SY!

Ingredients:
-4 boneless, skinless chicken breast, thawed
-1 packet ranch seasoning
-heaping 1/2 cup Shredded Parmesan cheese (in the refrigerated section)
***Make sure to use shredded, not grated!
-zip-lock bag, gallon size

Start by preheating the oven to 350°.
Place a sheet of aluminum foil on a baking sheet and spray it with non-stick cooking spray.


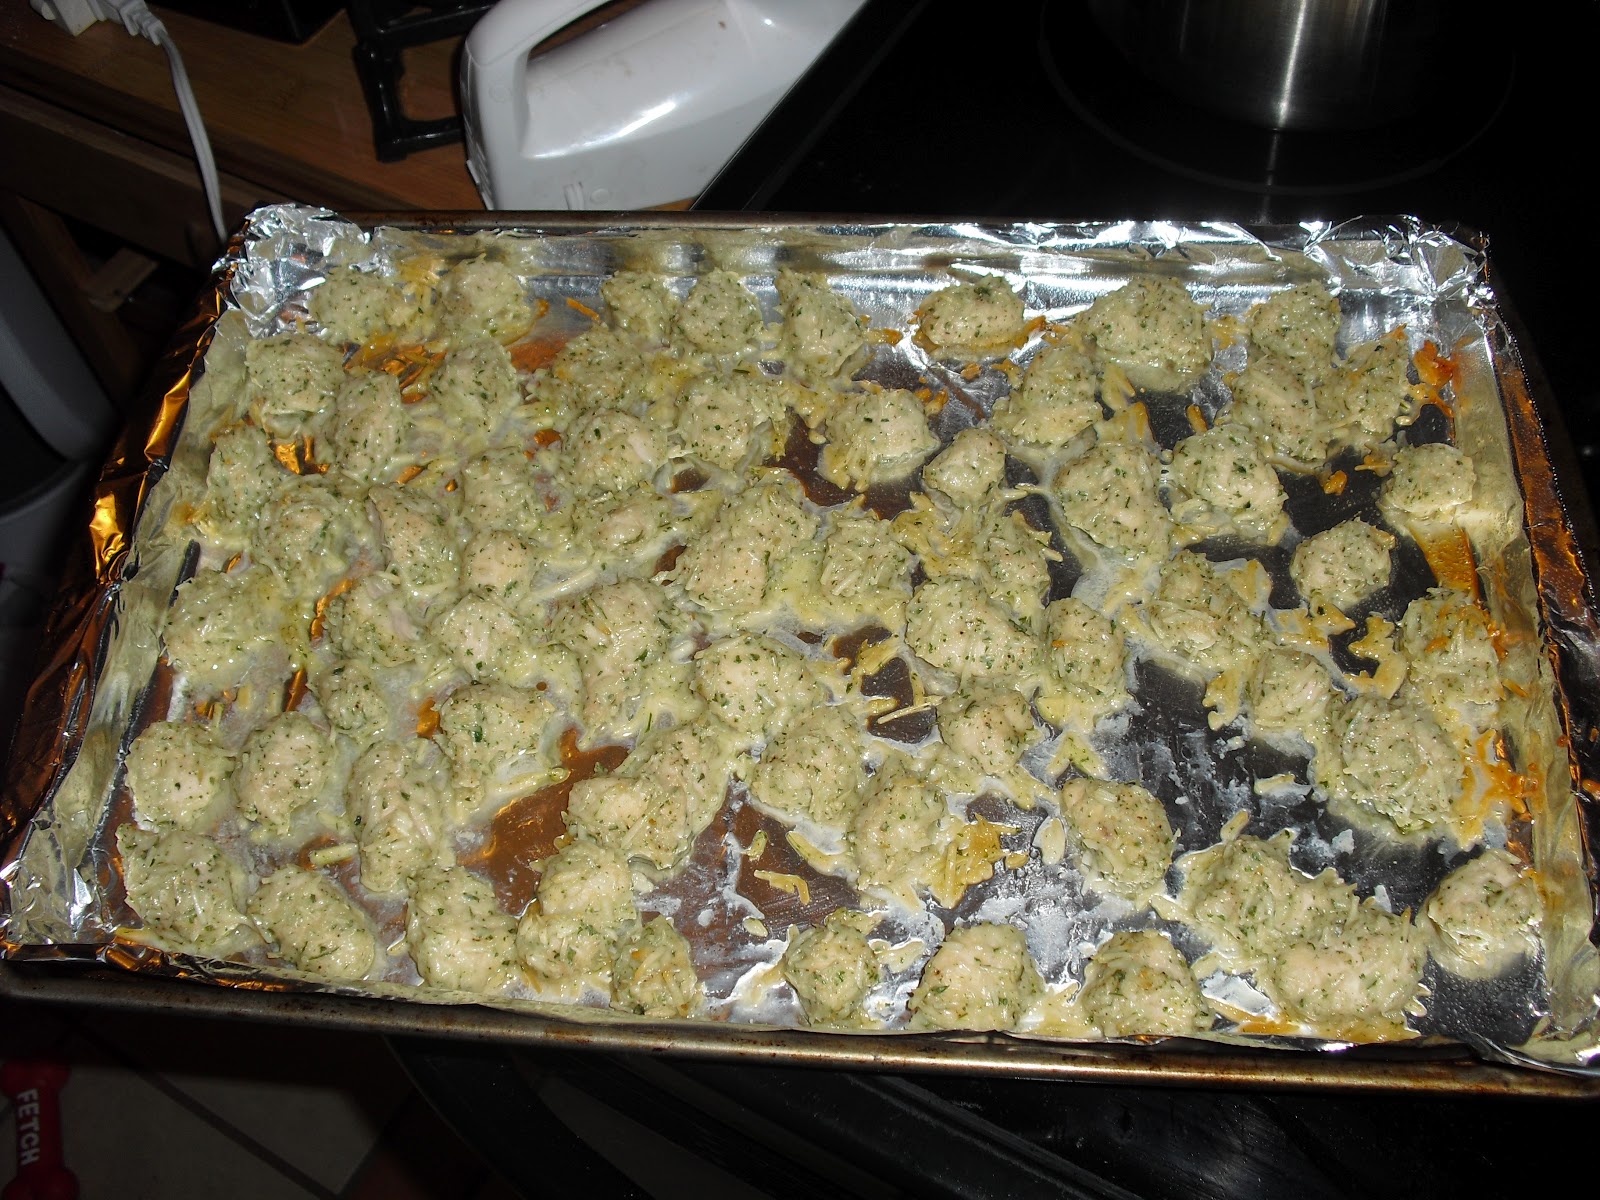
Next, cut the chicken breast into bite-sized pieces. Here is a picture of what your chicken should look like:


Next, get a zip-lock gallon sized bag and put in your ranch seasoning and parmesan cheese (make sure to use shredded parmesan cheese, not grated, the flavor is SO much better). Shake up your mixture to evenly distribute your seasonings and then add in your chicken and shake again until chicken is evenly coated. Place seasoned chicken on your baking sheet.

Finally, bake your chicken for 20 minutes and you are finished!

We usually have this as our main dish, or I will make a big salad and throw it on top. Both ways of eating it are excellent choices. :) Hope you enjoy!


Tuesday, January 31, 2012

How to: Sushi

I wanted my first post as a newlywed to be AWESOME, so I decided to go with something that often seems unreachable to a lot of people. Sushi is one of my favorite foods but also EXPENSIVE, so I only get to each it about once every two months. What is the solution to this? Making your own of course! Now let me warn you, this is my first time making sushi, so I didn't actually put anything raw in it. The most adventurous I got was imitation crab. With this post, I mostly wanted to show people how to actually roll the sushi and then people can experiment as they choose.

This roll of sushi was pretty basic, I was going for a Philadelphia-type roll. All of the ingredients are available at Wal-Mart, with the exception of 1, the bamboo scroll.

Ingredients:
-sushi rice (Asian food section)
-Seaweed Sheets (Asian food section)
-Imitation Crab (or whatever fish you choose)
-cucumber
-cream cheese (you can substitute Neufchatel cheese here if you choose, it has 1/3 less fat than regular cream cheese and tastes exactly the same)
-Bamboo Scroll (Available at food/kitchen stores & online, cost is about $9)
-Plastic wrap


Here are some suggestions of other things you can include in your roll depending upon your taste preferences.
-avocado
-jalapeƱo
-wasabi (Asian food section)

Cook your sushi rice according to the directions on the back of the package and then place in the refrigerator to cool for about 20 minutes. While you are waiting, wrap your bamboo scroll in plastic wrap. This will keep your scroll clean and it allows the sushi rice to roll right off the scroll. It doesn't have to be neatly wrapped, just completely covered. You may also use this time to cut up the ingredients you will use. The pieces you will place in your sushi needs to be very long and skinny because they will need to extend the entire length of the roll while not making it too fat. I would say to make the width of your ingredients (crab, cucumber, etc.) no bigger than 1/4-1/2 the size of a dime. The more ingredients you have, the smaller width you need.

Next place a seaweed sheet on top of the wrapped bamboo scroll. The seaweed sheet will be brittle and dry so be careful when handling it.


Next, wet your hands & place the cooled sushi rice on top of the seaweed and press it to cover the entire sheet. Make sure the seaweed isn't showing through because this will be the outside of the sushi roll. If you don't wet your hands before pressing the rice down, there will be 10x more rice on your fingers than on the seaweed, trust me, speaking from experience! It should look something like this:


Turn the seaweed over so that the side with the rice is face down on the bamboo scroll so that you can put the other ingredients inside the roll. Place a small amount of rice on this side of the seaweed sheet, so that the inside of the roll will be slightly sticky. Don't put very much or you will make the roll to thick.


Next place your desired ingredients about 1/2 an inch above the bottom of the seaweed sheet. This can be whatever ingredients you want, just make sure to not use to many. If the roll is to fat, it will not be able to touch when rolled and it won't stick together. Here I used crab, cucumber, & cream cheese.


Now, roll your sushi together inside the bamboo scroll, pressing it together as you roll. This may take some practice, but it fairly easy once you get the technique down. 


Once you have rolled the sushi it should look like this:


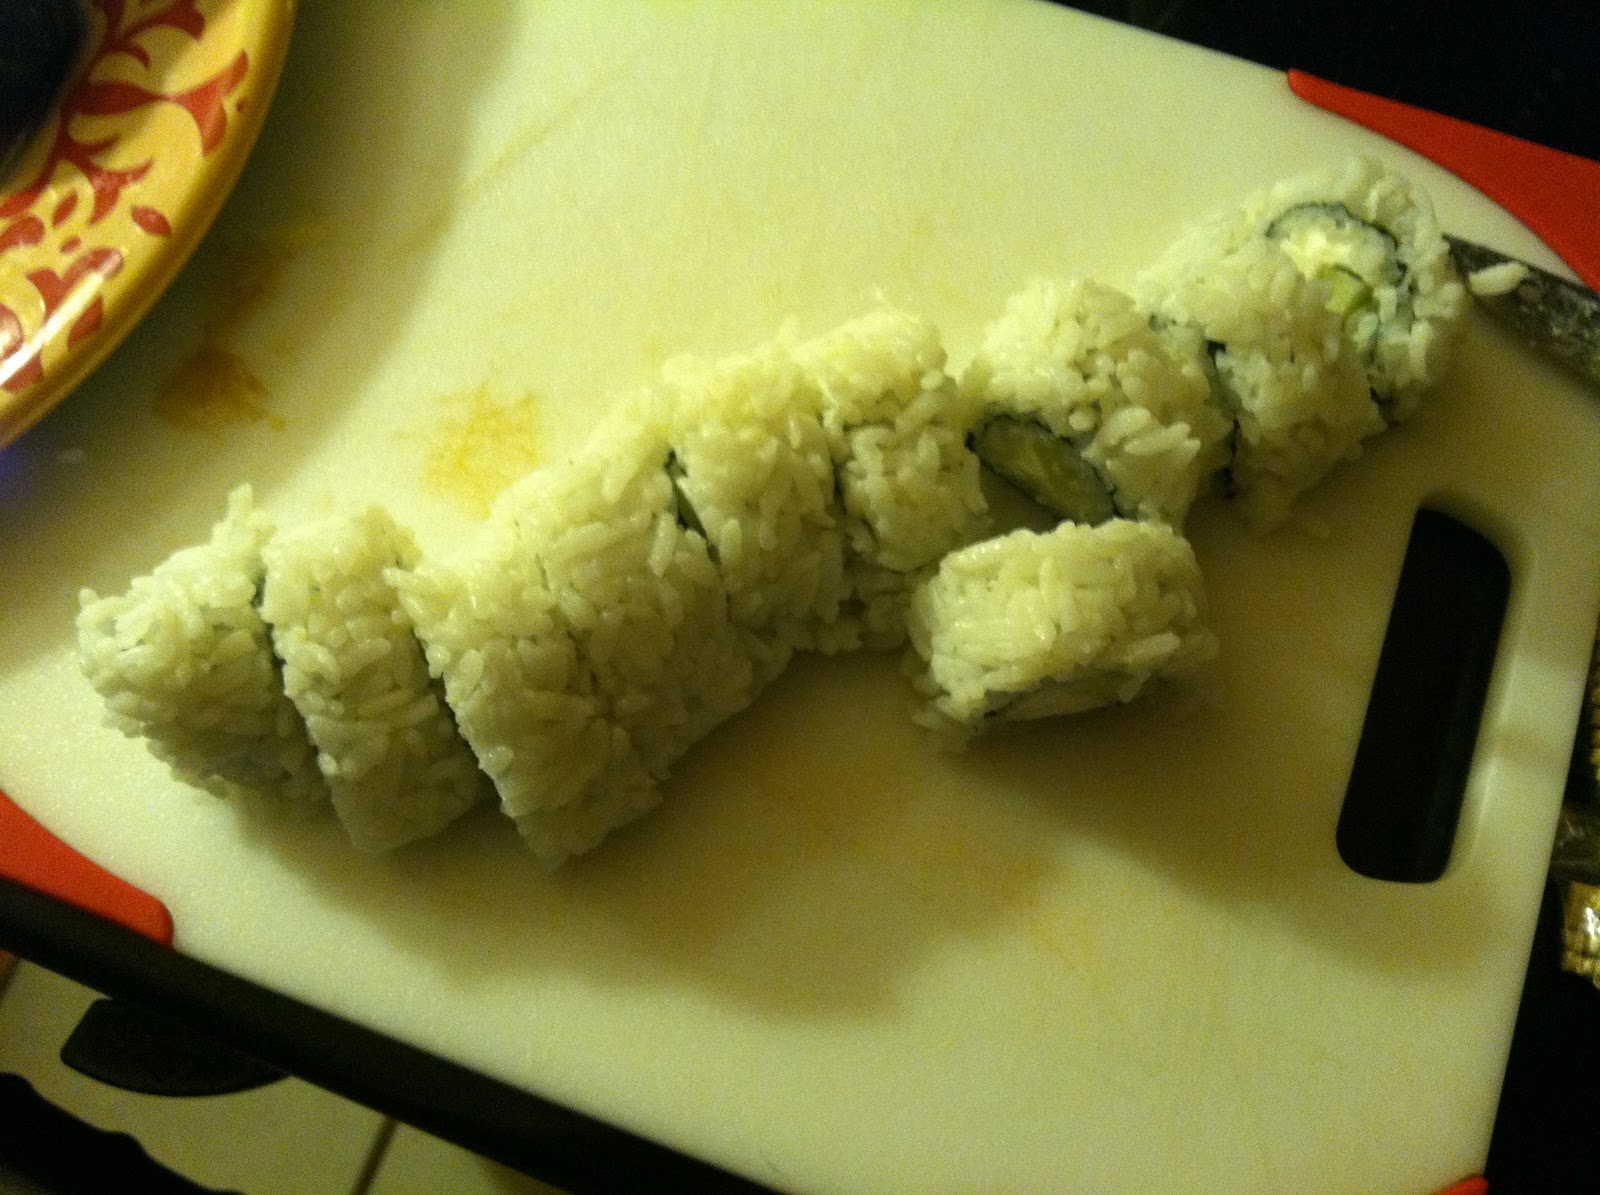
Next place the sushi on a cutting board or plate and cut it into individual pieces. Don't press your knife strait down (this will squish your roll), instead use a back and forth cutting motion. Here are some pictures of my finished product (please ignore the soy sauce I spilled on my cutting board!):


Once you are finished, you are ready to enjoy your sushi! I like to dip mine in soy sauce that is mixed with wasabi to give it an extra kick :)

If anyone has any ideas for ingredients or wants me to try and make a certain type of roll, leave a comment. Also, if you need clarification on any of the steps, feel free to ask! I hope yall enjoy your sushi!