Wednesday, July 24, 2013

Grow your own Pineapple


Hey Everyone! I hope you all are enjoying your week! Soon I will have a new recipe for you but today I wanted to share a quick post (let's face it, I'm long winded and there will probably be nothing short about it) on how to start growing your own pineapples!

Every time someone sees my pineapple plants they cannot believe I grew them. Then, they REALLY can't believe it when I tell them I grew them from a pineapple I picked up from our local grocery store. The best part is, it's REALLY easy to do! The biggest thing you need for this is a little patience! These also make great gifts. The hubby and I gave one to my father-in-law for Father's Day and he loved it!

Maybe this is my inner mother coming out but I love gardening. It brings me such joy. Seriously, there is something about going out and seeing all that hard work you have done... Not that gardening is really that hard... I pretty much just go out and water my plants every couple days. I like to think I'm really accomplishing something though.

Supplies:
-pineapple from the store (you want it to be as green as possible)
-clear glass
-water
-pot (or a place in the ground)
-soil

Pineapples are one of the best fruits you can grow in a container. They are perfect for people like me who live in a rent house and can't have a "real" garden. They also grow equally as well in the ground so plant yours however you would like!

When you are in the grocery store, you want to find the pineapple that is as green as possible. Normally, if you were buying the pineapple purely to eat you wouldn't want to do that. A pineapple is ripe when the little grooves on it start to turn yellow. This is when a pineapple is at it's sweetest. If you buy a pineapple like that to grow, it will not produce roots because it has been off the vine to long. Trust me, AS GREEN AS POSSIBLE! I tried this with a ripe pineapple and it did not work out. Here is a picture of mine.

 
To take of the green stem, grab it firmly in one hand and twist. You should be able to twist it right out of there. Put the fruit part over to the side to cut up and enjoy later. Next, cut off the little bit of pineapple left on the end until you can see little spots in the yellow part. Those are the roots and you want them exposed to water.
 

Next, take the little green leaves at the bottom and peel them off one by one until the roots are exposed. This usually ends up being about 10-20 leaves. Here is a picture of one of the leaves peeled up and then another of the plant with the leaves peeled off.


The roots will poke out through those levels you created when you peeled the leaves off. Next, put your pineapple in a glass with just enough water to cover the bottom where you exposed the levels.


Next, place your pineapple plant in a sunny window and watch it grow! The roots look like little white worms and will slowly emerge from the levels. Below is a picture of what the roots will eventually get to. This takes a couple weeks.
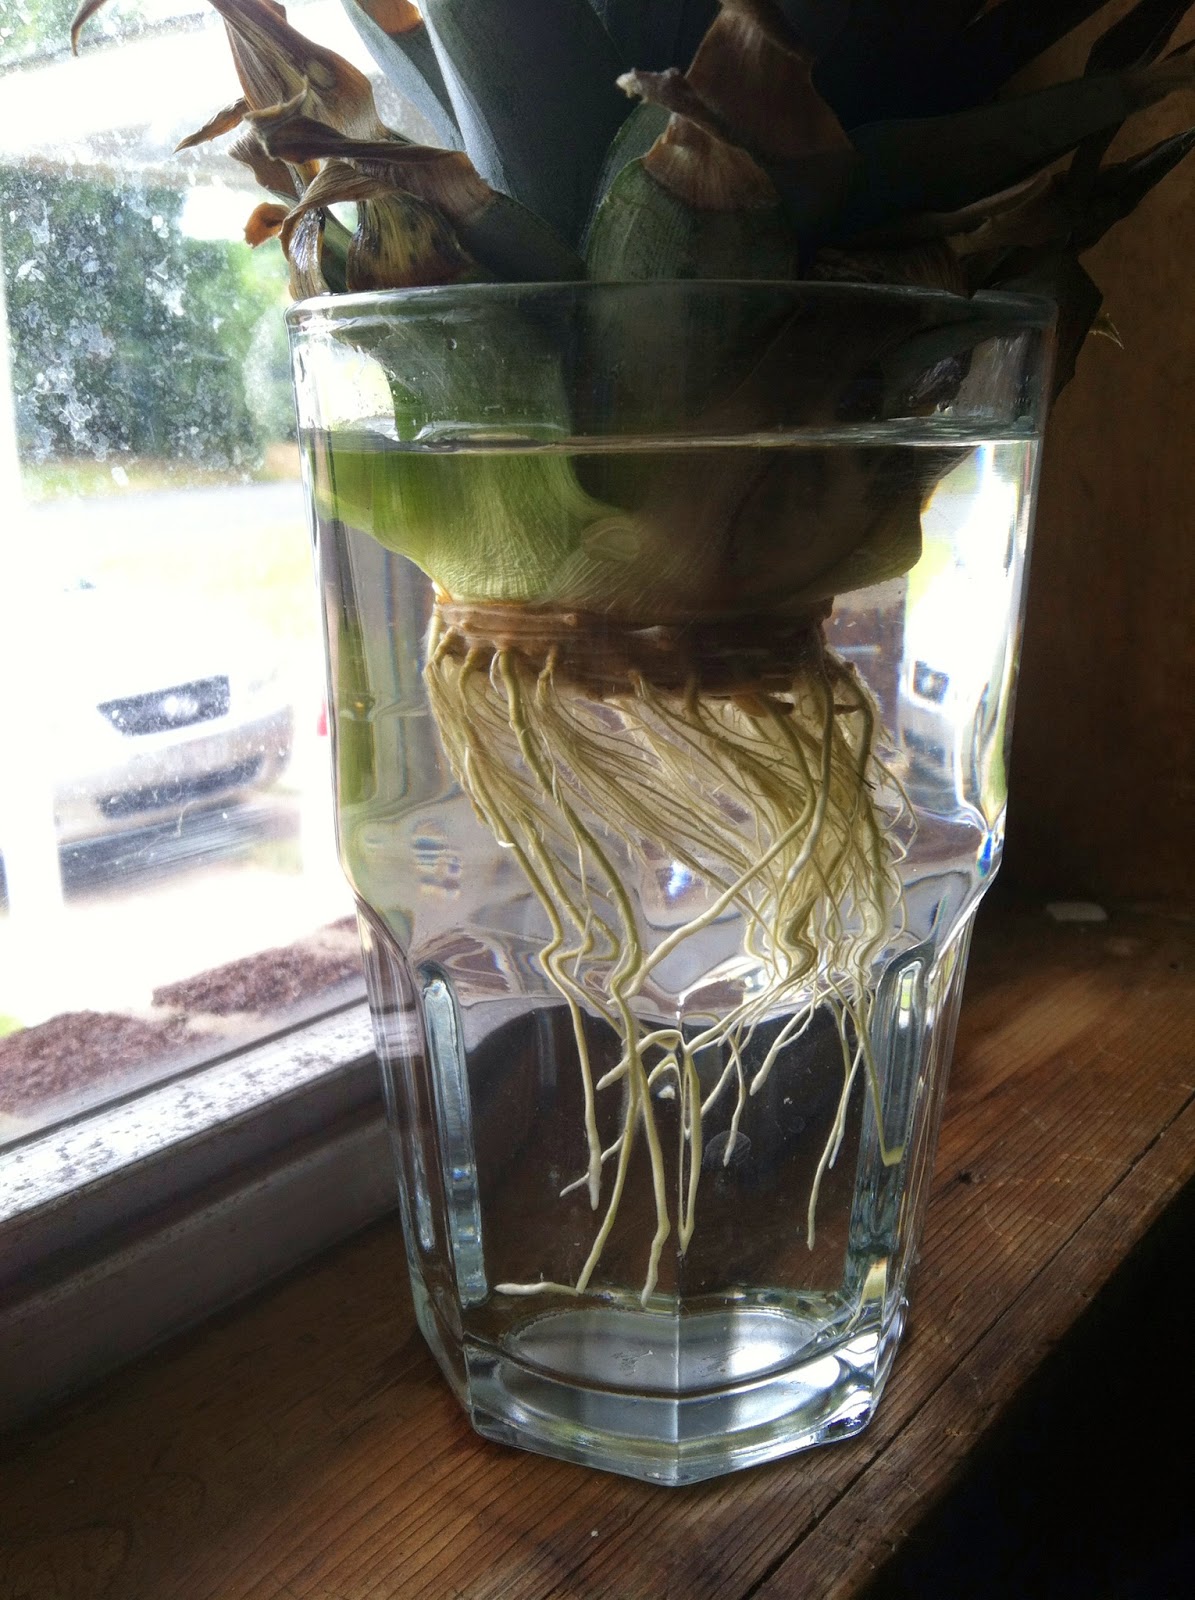

You will know the plant is ready to put in the soil when your roots have little white sprouts coming out of them. They kind of look like little hairs. Here is what your plants look like when you have just planted it. Don't worry if the leaves on the outside start to turn a little brown (you can see that in both the cup picture and the planted picture).


Once your plant gets settled it will start growing! Below is what my first pineapple plant has grown to. Isn't it beautiful? As you can see, the leaves grow out of the middle so the ones on the outside are the oldest. That's also where the fruit will grow out of (that part takes a while).


 Water your plant about once a week to keep the soil moist and most of all, enjoy it!
 
Good luck! Let me know in the comments below what your favorite thing to grow is!
Friday, July 12, 2013

DIY Succulent Garden


Hey Everyone!

I have decided to start sharing gardening tips and tricks with you because my little garden has been quite successful! This was my first year to try my hand at gardening and it has worked out really well!

Today I'm sharing with you how to make a succulent garden. Succulents are pretty much the cutest little plants in the world. They are so tiny but have so much character at the same time. When I was buying mine the cashier had never seen them and though they were precious! My hubby was gone all week in Vegas (lucky!) so I decided to do a little project as a treat to myself. I'm so glad I picked this!

I have been wanting to make one of these for awhile but I was nervous about it until I saw this tutorial from Kala over at My Breezy Room. She made it look so easy so I knew I could do it! The project ended up taking about 5 minutes total to complete and it has already added so much character to our house. I can't wait to make another!

Succulents like bright indirect light so find a nice window to put them in after you make them. If you put them out directly in the sun it will scorch them because they are very fleshy plants. They are also really easy to take care of, all they need is a little water when the soil gets dry (about once a week). In the winter you will want to take that down to about once a month in order to prevent root rot.

Supplies:
-Glass planting pot/dish (I got mine in the wedding section, I think it's actually for floating candles but whatev)
-Soil
-Succulents

Sorry all the pictures are kind of dark, I did this at night. Here is a picture of the glass pot I used:


I forgot to get a picture of the succulents before I planted them, sorry about that.

To make this little beauty, simply fill your pot with a small amount of soil to cover to bottom of the pot.


Next, place your succulents in one by one. You can use as many or as few as you like, but I wanted my pot to look full. I also tried to chose succulents that looked different to give the pot some dimension. It was fun picking them out, Walmart had about 20 different one to chose from! Here is a picture half way through:


Finally, fill in the spaces around the plants to make the soil even and water slightly to moisten the soil.


Isn't that so cute?! The little tiny cactus in the front is my favorite. The picture doesn't even do this thing justice because the little succulents are so cute and have so much detail.

I hope you enjoy making your own succulent garden, I can't wait to make another one!
Wednesday, July 3, 2013

My Favorite 4th of July Pinterest Posts


Hey Everyone!

I hope you are preparing for an awesome 4th of July tomorrow! The hubby and I are extremely excited because we have the day off work. We are planning on spending the day relaxing, we can't wait!

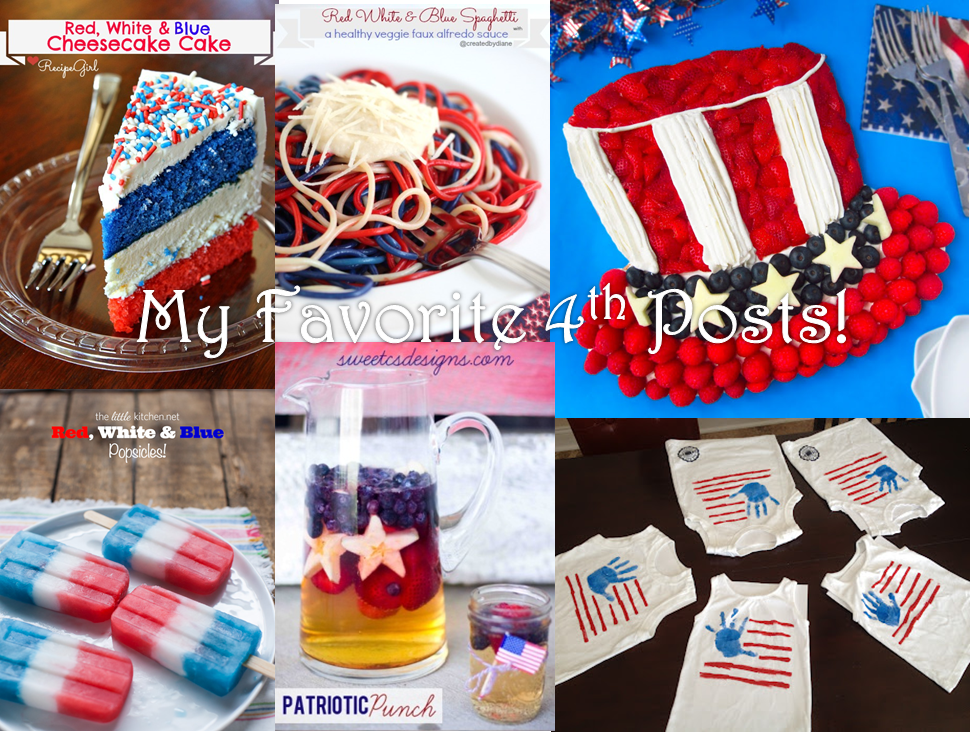
Today I thought I'd share with you some of my favorite 4th of July posts from Pinterest. Anytime I'm looking for an idea, Pinterest is my first stop and it didn't disappoint with the 4th of July posts! I have included a few here on the blog but there are TONS more on my 4th of July board on my Pinterest page. Please check it out!

1. Patriotic Punch from Sweet Cs Designs


I LOVE this stuff. It is so pretty and would go perfectly with any 4th of July party! Plus, you could always crank it up into an adult beverage if you wanted! :)

2. Red, White, & Blue Popsicles from The Little Kitchen


Living in Texas, we NEED something to cool us down, especially in July. These popsicles are perfect for that! They are perfect for kids (or adults!) to enjoy at any 4th of July party.

3. Flag Tank tops from Look What Erin Made


These little tank tops are the curtest and would be the perfect attire for a 4th of July party. The post is for kids but adults could rock them too!

4. Red, White, & Blue Cheesecake from Recipe Girl


This is BY FAR one of my favorite Pinterest finds! It's so cute and will have your guests thinking you are a professional! The directions are easy to follow and make an awesome product!

5. Red, White, & Blue Spaghetti from Created by Diane


Trying to be patriotic and maintain your healthy lifestyle? This is a wonderful post to help you do that. These colored noodles are so cute and the sauce is similar to the Cauliflower Alfredo Sauce I posted a few weeks ago. Very cool!

And last but not least....

6.4th of July Fruit Pizza by Hungry Happenings


I LOVE THIS! Fruit pizza is one of my favorites and this is one of the cutest fruit pizzas I have ever seen. This would be a great addition to any 4th of July party.

There ya have it! Don't forget to head on over to my 4th of July Pinterest board and check out some more awesome 4th of July finds!

Have a happy 4th of July!


Friday, June 21, 2013

Crockpot General Tso's Chicken


Hey everyone! I have missed you lately! The hubby and I are now semi-moved in.... well, we have the kitchen, dinning room, and master bedroom unpacked. Hey, those are the important things right? I just don't have time to unpack with summer school going on.... one more week left! WOO HOO!

Anyways, today I have an awesome little recipe for you. I love Chinese food and one of my favorite dishes is general tso's chicken! It's got an awesome flavor and just enough spicy-ness to be AMAZING! The only thing I hate about making it is having to bread the chicken. It takes foreverrrrrrrr and it's not exactly the easiest thing in the world so I had a thought, crockpot! This is one of those recipes that you throw everything in and then leave it to cook for 8 hours (no cooking things ahead) so its extra awesome!

Ingredients:
-General Tso's Chicken seasoning mix (you can get this in the Asian section of your grocery store for about 85 cents! See picture below)

-4 Frozen boneless, skinless chicken breast
-2-3 Tbsp. Soy sauce
-1/4 cup Sugar
-1/2 cup water (use less if you want a thicker sauce)
Optional:
-2-3 Tbsp. Chili Garlic sauce*


*This stuff is amazing! It's made by the same people that make sriracha and can be found right next to it. I use it in almost everything I cook and would definitely recommend it! It really takes this recipe over the edge!

Ok, to make this dish throw everything into the crockpot and mix together. Seriously, its that easy! Set your crockpot to cook for 6-8 hours and leave it be. I usually try and stir mine every couple hours to keep the chicken coated but this is optional.


When your chicken is done you can either eat the breast whole or cut it into smaller pieces. I wanted our to be more authentic so I cut it up. It ended up being more shredded because the chicken was so tender but that's ok!

I also let the chicken stay warm in the crockpot for 30 more minutes after I cut it up so it could soak up some more flavoring! Here is a picture of the final product served over rice!


Happy cooking!!
Thursday, June 6, 2013

7 Breakfast Recipes


Hey everyone! Sorry I have been MIA lately, the hubby & I moved so most of my cooking and craft stuff has been packed away in boxes. Don't worry, the new house has given me lots of ideas for new projects! I haven't had time to cook anything lately so today I thought I'd share my 7 favorite breakfast items with you. These are all delish and are perfect for a brunch or just everyday at home.

LET'S GET READY FOR SOME BREAKFASSSSSSSSSSSSSSSST!

Sorry, that football theme song popped in my head and it seemed to fit. Come on, you know what I'm talkin' 'bout! Ok, back to it. Here are my 7 favorites!

1. Breakfast Ring
This is one of the most requested breakfast items by the official taste tester. He LOVES it. AND it's great because there are so many possibilities for combinations!


2. Banana Oatmeal Muffins
Um, can you say yum? These muffins will not disappoint! Plus, these things are made with healthy-ish ingredients! :) I like to make them very un-healthy by spreading some butter on them.


3. Cinnamon Sugar Grapefruit
Say whaaaat? Cinnamon & Sugar on grapefruits? Yes, this is true. I don't know about you guys but the tart-ness (is that even a word? tart-ness?) of grapefruits makes them hard for me to eat. They are especially distasteful with your morning cup of coffee. This recipe solves those problems and gives them a hint of sweetness that is perfect!


4. Kolaches/Pigs in the Blanket
Who can forget an all time favorite/classic in their breakfast menu? Not me that's for sure. Now what these things are called depends on where you live. Up in my mom's home town (Dallas/Fort Worth area) these are called pigs in the blanket and here is the Houston area, these are called Kolaches. Don't you Houstonians know a kolache is a Czechoslovakian fruit pastry? Duuuuuuuh. No amount of blabbering by me has convinced anyone of this so if you live anywhere else in the world, please weigh in below in the comments.


5. Breakfast Quesadilla
This item is one of my personal favs. My mom always made this for my sisters and me when I was younger and having it always brings back good memories. This is also great because like the Breakfast Ring above, it has many options for combinations!


6. Sausage Balls
Unless you are a vegetarian, you CANNOT tell me you don't like sausage balls. They are SO GOOD. I love these at breakfast time but I, of course, could eat them at any time of the day. These are great to make the night before and then just heat up in the a.m. when you are in a hurry.

AND LAST BUT NOT LEAST...

7. Migas
I love Mexican food and can eat it at anytime, even the morning. Daniel complains because anytime we go out to eat I want Mexican. If you have not ever had Migas, you should try them. They are easy to make and taste great! Not to mention, these also have quite a few possibilities for combinations!

And there ya have it! These are some of my favorite breakfast items! Who would drive through Sonic for a breakfast burrito when they have these possibilities? Not me that's for sure! I hope you guys enjoyed!
Wednesday, May 29, 2013

Blog Love


Hey Everyone!

Today I wanted to do a short post for you introducing you to one of my friends! I have known my friend Sarah since elementary school. She is currently working on a master's degree from Texas Women's University  in Nutrition and has been doing some wonderful things!

Sarah started a blog that is full of recipes and great tips for a healthy lifestyle. I love following along and know you will too! You can check out her blog here and you can also follow her on Facebook and Twitter.

I hope you enjoy!
Friday, May 24, 2013

Healthy Cauliflower Alfredo


Hey everyone! I hope you are having an awesome Friday! I have been asked about the recipe I'm sharing today by quite a few different people... they can't believe that I made anything out of cauliflower that was even remotely edible. I guess my friends don't like cauliflower very much! Keep the faith and read on!

I posted a regular Alfredo Recipe about 8 months ago that I LOVED but the calories in it kill me. Seriously, that recipe probably has about 3500 calories or more in it.... yikes! This recipe has about 1000 in the whole dish (mostly from the pasta) so I can eat it guilt free! Not to mention, cauliflower is packed full of vitamins and minerals so it's really good for you!

This recipe is awesome, but it may take some convincing to get your guests to eat it. When I told the official taste tester what we were having for dinner he gave me a weird look and said, "Can I have a cheeseburger instead?" What a man of little faith! It's probably because of the time I told him we were having hamburgers and instead of meat I used a portabella mushroom. He was really grossed out and I think we ended up having Taco Bell that night. Whoops!

I can't take credit for this recipe, I got it from a blog called Pinch of Yum. The girl that runs this blog is a SAINT and her and her husband are working at an orphanage in the Philippines. Let's all try to be a little more altruistic in her honor shall we? I tweaked the recipe slightly because some of the ingredients in the Philippines are a little different than the ones here. I hope you enjoy (don't worry, you will)!

Ingredients:
-1 head of cauliflower
-6 cups vegetable broth
-minced garlic (I LOVE garlic so I used A LOT... original recipe calls for 6 cloves)
-1 Tbsp. Butter
-1 tsp. Salt (or you can eyeball it like I did)
-pinch of nutmeg
-pinch of black powder
-1 Tbsp. Olive oil
-1/4 cup heavy cream
-1 cup of starchy water from the water you use to boil your pasta
-package of linguine noodles (or your favorite kind!)

To start this recipe, cut your cauliflower up into pieces and boil in the vegetable broth for 20 minutes. The size of the cauliflower doesn't really matter to much, I just made my pieces the size of the cauliflower you see on veggie trays.


Next, put your boiled cauliflower in your blender with about 3 cups of the broth you boiled it in. The rest you can throw away (or give it to your dogs like I did). Blend your cauliflower and broth until the cauliflower is creamy just like Alfredo sauce. This took me about a minute because we have a really nice blender (Thanks Will & Kaci for the awesome wedding gift!), but it could take up to 5 minutes. When in doubt, blend a little longer because you don't want your sauce to be chunky.

Also, let me warn you, blended cauliflower smells ODD.... and by odd I mean bad. This further caused my hubby to turn up his nose, but trust me, once you move to the next step, the smell mostly goes away!

I forgot to take a picture of the cauliflower in the blender, but you can see a picture of it in the pan in a bit. It looks exactly the same.

After your cauliflower is blended, get your pasta boiling so it will be ready when you are done. While that's going, get a medium-large sauce pan, melt your butter, and saute your minced garlic for 3-4 minutes. Once your garlic is done, scrape it into your blender (keep your pan, you will be using it in a sec!) and add in your salt, nutmeg, black pepper, and olive oil. Blend it a little more to make sure everything is mixed.

Once smooth, add your cauliflower mixture back into the pan you used for your butter/garlic and cook over low heat (it still should be hot from boiling it). Add in your heavy cream and your starchy water from your pasta and cook over low heat until hot enough to serve.

 
This sauce may be a little darker than regular Alfredo, but it tastes just as good! Here are some pictures of the final product:


YUMMY! But now for the real test.... did the hubby like it?

Before trying it:

After trying it:

Isn't that face cute? I don't know why (eventhough I kinda do) he even doubted me! He actually said that he wouldn't have been able to tell the difference if he hadn't already known AND that he likes this recipe better than the other alfredo recipe I have. TAKE THAT TO THE BANK!

I hope you enjoy this awesome and healthy recipe!